
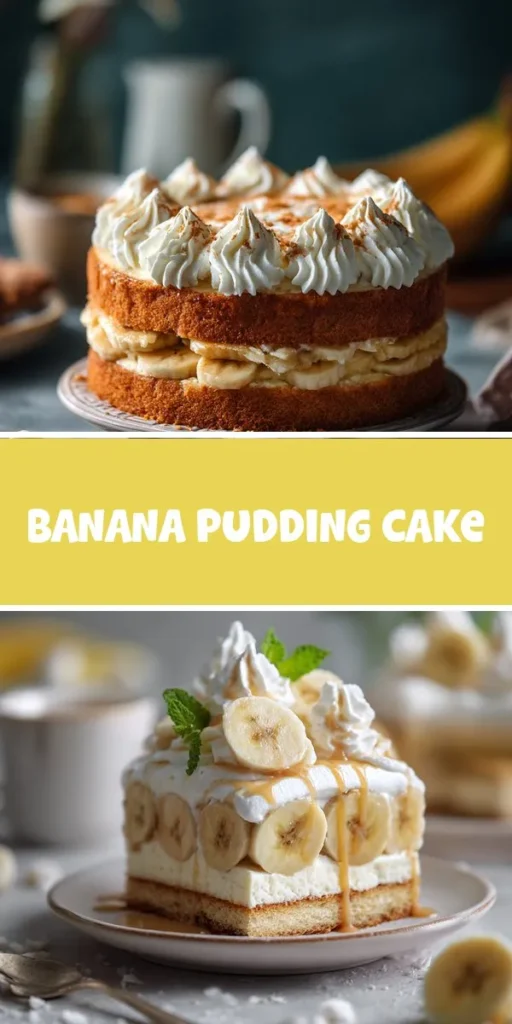
# Banana Pudding Cake: A Delightful Dessert Experience
## About This Recipe
Banana Pudding Cake is a delightful dessert that marries the comforting flavors of traditional banana pudding with the soft, inviting texture of cake. This recipe draws inspiration from the classic Southern dessert known for its creamy layers and sweet banana flavor. While banana pudding is often served in a bowl, transforming it into a cake creates a unique presentation that is sure to impress your guests.
This cake has its roots in Southern cuisine, where banana pudding is a beloved staple, often associated with family gatherings, potlucks, and barbecues. The Banana Pudding Cake stands out for its nostalgic appeal, bringing back fond memories of childhood desserts while providing a modern twist. It’s perfect for any occasion, be it a birthday party, holiday celebration, or simply a weekend treat to share with loved ones.
## Why You’ll Love This
There are countless reasons to fall in love with Banana Pudding Cake. First and foremost, its texture is light and moist, making each bite a delightful experience. The rich banana flavor shines through, complemented by layers of creamy pudding and whipped cream, creating a harmonious balance of taste and texture.
One of the best aspects of this cake is its simplicity. The recipe is beginner-friendly, which means that even novice bakers can create a stunning dessert without feeling overwhelmed. You’ll find the steps straightforward and the ingredients easily accessible, allowing you to whip up this cake in no time.
Additionally, Banana Pudding Cake is incredibly versatile. It can be served at various events, from casual family dinners to more formal gatherings. This cake not only satisfies sweet cravings but also serves as a conversation starter, as many people will remember the classic banana pudding from their childhood.
## Ingredient Breakdown
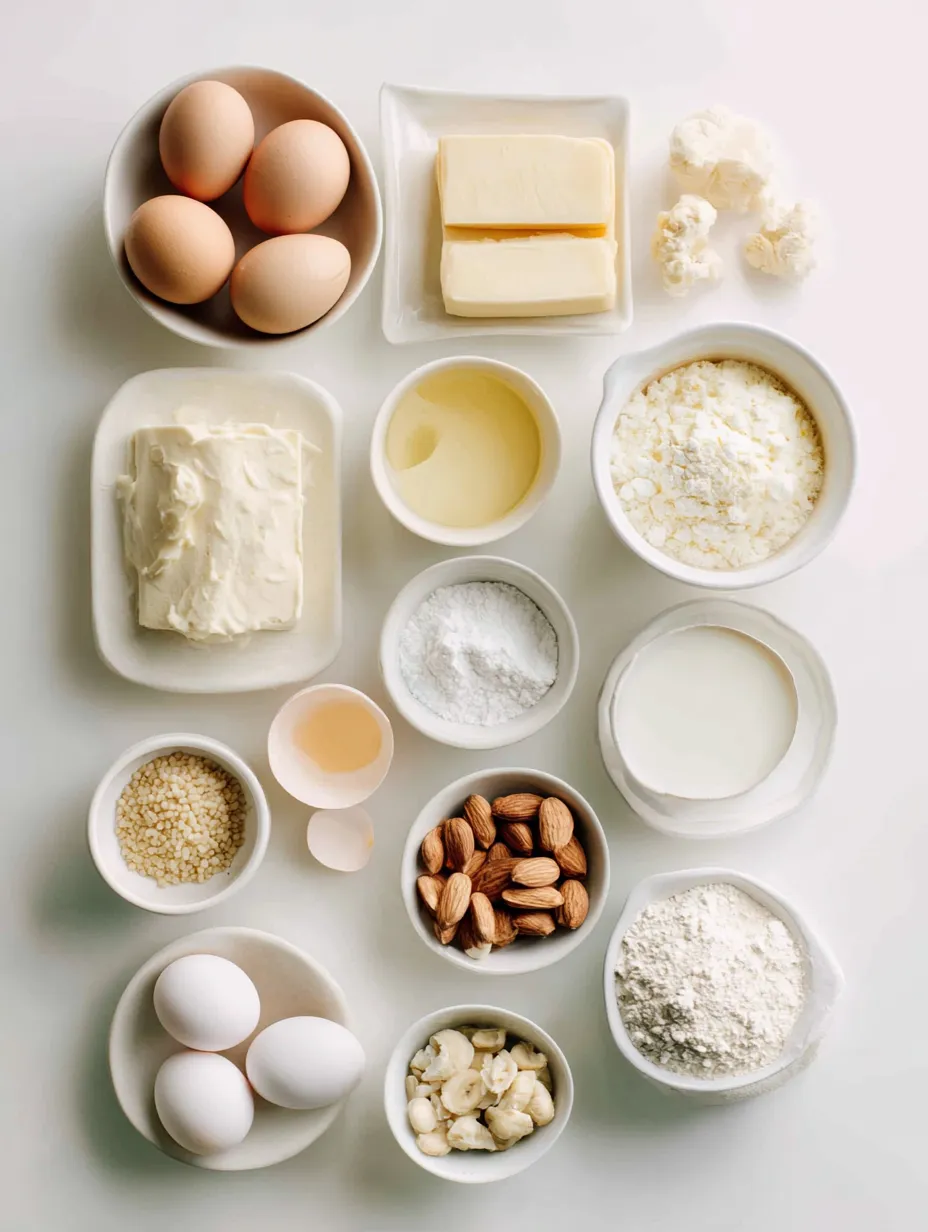
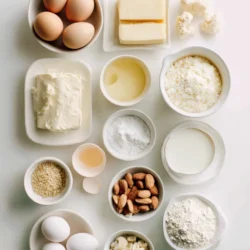
Understanding the role of each ingredient is crucial for creating a successful Banana Pudding Cake. Here’s a closer look at what you’ll need:
– **All-Purpose Flour**: This is the foundation of your cake. It provides the structure necessary for the cake to rise and hold its shape. All-purpose flour has a moderate protein content, making it versatile for a variety of baked goods.
– **Baking Powder, Baking Soda, and Salt**: These are your leavening agents. Baking powder helps the cake rise and become fluffy, while baking soda works to enhance the browning and flavor. Salt balances the sweetness and enhances the overall flavor profile of the cake.
– **Unsalted Butter**: Butter adds richness and moisture to your cake. Using unsalted butter allows you to control the salt content in your recipe. It also contributes to a tender crumb, making the cake soft and delicious.
– **Granulated Sugar**: This sweetener is essential for flavor and moisture. Sugar not only sweetens the cake but also helps to create a tender texture by inhibiting gluten formation.
– **Eggs**: Eggs act as a binding agent, helping to hold the ingredients together. They also add moisture and richness to the cake, contributing to its overall flavor and texture.
– **Vanilla Extract**: This ingredient adds a depth of flavor that enhances the sweetness of the cake. Vanilla is a classic flavor pairing with bananas, making it a crucial component in this recipe.
– **Ripe Bananas**: The star of the show! Ripe bananas provide natural sweetness and moisture, along with that unmistakable banana flavor. Ensure your bananas are well-ripened with plenty of brown spots for maximum flavor.
– **Buttermilk**: Buttermilk adds acidity to the cake batter, which reacts with the baking soda to create a tender crumb. It also contributes to the cake’s moistness and enhances the flavor.
– **Instant Vanilla Pudding Mix**: This mix is used to create the pudding layer of the cake. It provides creaminess and additional vanilla flavor without the need for extensive cooking.
– **Heavy Whipping Cream**: Heavy cream is used to make the whipped topping. It has a high fat content, which allows it to whip up beautifully and hold its shape, creating a light and airy layer.
– **Powdered Sugar**: This fine sugar is used to sweeten the whipped cream. It dissolves easily and helps to create a smooth texture without any graininess.
– **Vanilla Wafers**: These cookies add a delightful crunch and are a classic component of banana pudding. They provide texture and flavor, enhancing the overall experience of the cake.
– **Sliced Bananas for Garnish**: Fresh banana slices are used for decoration and additional banana flavor. They add visual appeal and make the cake even more inviting.
## Step-by-Step Preparation
Now that you’re familiar with the ingredients, let’s dive into the preparation of your Banana Pudding Cake. Follow these steps to create a delicious dessert.
1. **Preheat Your Oven and Prepare the Baking Pan**:
Start by preheating your oven to 350°F (175°C). While the oven heats up, prepare your baking pan. Grease and flour a 9×13-inch baking dish or line it with parchment paper to ensure your cake comes out easily after baking.
2. **Mix the Dry Ingredients**:
In a medium bowl, whisk together the all-purpose flour, baking powder, baking soda, and salt. This step ensures that the leavening agents are evenly distributed throughout the flour, promoting even rising during baking.
3. **Cream Butter and Sugar**:
In a large mixing bowl, use an electric mixer to cream together the unsalted butter and granulated sugar. Beat them together on medium speed until the mixture is light and fluffy, which usually takes about 3-5 minutes. This step is important as it incorporates air into the batter, helping the cake to rise.
4. **Add Eggs and Bananas**:
Add the eggs, one at a time, mixing well after each addition. Then, mash the ripe bananas in a separate bowl and add them to the butter and sugar mixture. Mix until just combined, being careful not to overmix.
5. **Combine Wet and Dry Ingredients**:
Gradually add the dry ingredient mixture to the wet ingredients, alternating with the buttermilk. Start with a third of the dry mixture, followed by half of the buttermilk, and repeat until all ingredients are combined. Mix until just combined; overmixing can lead to a dense cake.
6. **Bake the Cake**:
Pour the batter into the prepared baking pan and spread it evenly with a spatula. Place the pan in the preheated oven and bake for 25-30 minutes, or until a toothpick inserted into the center comes out clean.
7. **Cooling Process**:
Once baked, remove the cake from the oven and allow it to cool in the pan for about 10 minutes. Then, transfer it to a wire rack to cool completely. This cooling step is essential as it prevents the cake from becoming soggy when you add the pudding and whipped cream layers.
## Component Preparation
While the cake is cooling, you can prepare the pudding layer and whipped cream.
1. **Prepare the Pudding Layer**:
In a mixing bowl, combine the instant vanilla pudding mix with cold milk according to the package instructions. Whisk until the mixture thickens, which usually takes about 2 minutes. Set it aside to allow it to firm up slightly.
2. **Make the Whipped Cream**:
In another bowl, use an electric mixer to whip the heavy cream until soft peaks form. Gradually add the powdered sugar and continue whipping until stiff peaks form. This will create a light, fluffy topping for your cake.
With the cake cooled and the pudding and whipped cream prepared, you are now ready to assemble your Banana Pudding Cake. Stay tuned for the next section, where we will guide you through the final steps of layering and decorating this delicious dessert.
### Whisking the Instant Pudding Mix with Milk
To create the creamy filling for your Banana Pudding Cake, start by whisking together the instant pudding mix and cold milk in a medium-sized bowl. It’s essential to use cold milk, as this will help the pudding to set properly. Using a whisk, combine the pudding mix and milk until there are no lumps, and the mixture is smooth. This process usually takes about two minutes. Once well-blended, set the bowl aside to allow the pudding to thicken.
### Allowing the Pudding to Thicken
After whisking, give the pudding mix some time to thicken. This typically takes about 5 minutes. During this waiting period, you can prepare the heavy cream for the whipped topping. It’s important to let the pudding sit undisturbed so that it can reach the right consistency—creamy and luscious, perfect for layering with cake and bananas.
### Beating the Heavy Cream with Powdered Sugar
In a separate large bowl, pour in the heavy cream and add the powdered sugar. Using an electric mixer, beat the cream on medium speed until soft peaks form. This usually takes about 3-5 minutes. Be careful not to overbeat, as you want to achieve a light and fluffy whipped cream rather than a butter-like texture. Once the cream reaches the desired consistency, gently fold in the prepared pudding mixture with a spatula. This combination will create a rich, creamy filling that is the star of your Banana Pudding Cake.
### Assembly & Serving Tips
Now that you have your cake, pudding, and whipped cream ready, it’s time to assemble your Banana Pudding Cake.
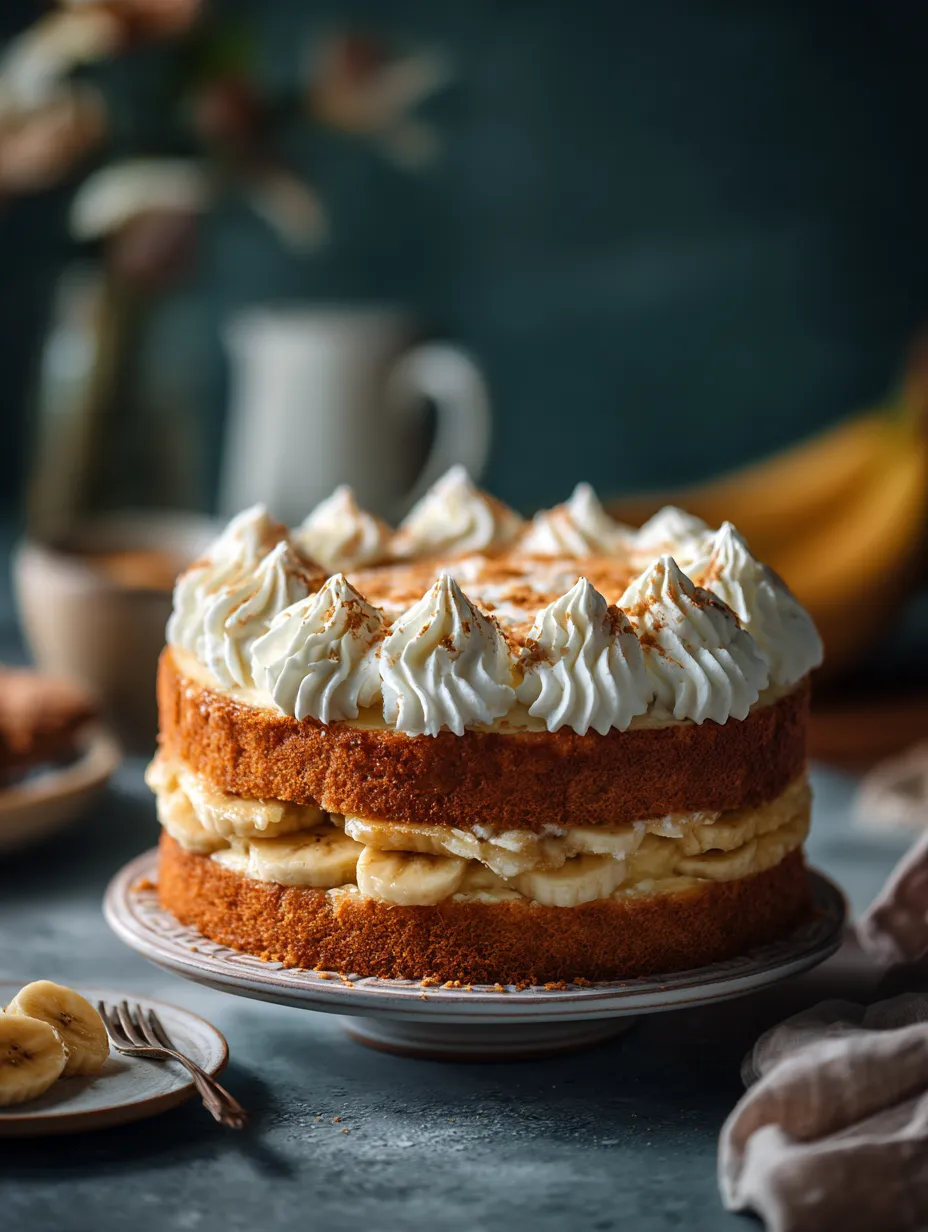
1. **Layering the Pudding and Whipped Cream on the Cooled Cake**: Begin by cutting your cooled cake horizontally into two layers. Place the bottom layer on a serving platter, then evenly spread half of the pudding mixture over the cake. Gently smooth it out with a spatula, ensuring even coverage.
2. **Topping with Crushed Vanilla Wafers and Sliced Bananas**: Next, slice fresh bananas and layer them over the pudding. Follow this with a generous sprinkle of crushed vanilla wafers for that classic banana pudding texture. Repeat this process with the second layer of cake, topping it with the remaining pudding mixture and another round of banana slices and crushed wafers.
3. **Chilling the Cake Before Serving**: Once assembled, cover the cake with plastic wrap and refrigerate it for at least 4 hours, or overnight if possible. This chilling time allows the flavors to meld beautifully and the pudding to set, resulting in a slice that holds together and is bursting with flavor.
### Presentation
Presentation is key to making your Banana Pudding Cake not only delicious but visually appealing. Here are a few tips:
– **Serving on Decorative Plates**: Choose colorful or patterned plates that complement the cake’s colors for an eye-catching presentation.
– **Garnishing with Additional Banana Slices and Vanilla Wafers**: Just before serving, garnish the top of your cake with additional banana slices and a sprinkle of whole or crushed vanilla wafers. This adds visual texture and highlights the cake’s flavors.
– **Using Fresh Mint Leaves for a Pop of Color**: A few sprigs of fresh mint can add a lovely contrast and a touch of elegance to your dessert. Place them thoughtfully around the cake for a sophisticated finish.
### Variations
Encourage your creativity by trying some variations of the classic Banana Pudding Cake recipe:
– **Using Different Flavors of Pudding Mix**: Experiment with flavors like butterscotch or chocolate pudding for a unique twist. These alternatives can elevate the cake and offer a delightful surprise to those who taste it.
– **Incorporating Nuts for Added Texture**: Adding chopped walnuts or pecans can introduce a crunchy texture that complements the creamy filling. Simply mix them into the pudding layer or sprinkle on top.
– **Making a Gluten-Free Version**: If you or your guests are gluten-sensitive, substitute the all-purpose flour in the cake recipe with a gluten-free flour blend. Ensure that your vanilla wafers are also gluten-free.
### Storage Guidelines
To keep your Banana Pudding Cake fresh and delicious, follow these storage guidelines:
– **Refrigeration Guidelines**: Always store the cake in the refrigerator, especially since it contains dairy products. Use an airtight container or cover it tightly with plastic wrap to prevent it from absorbing odors from other foods.
– **How Long It Lasts in the Fridge**: The cake will generally stay fresh for about 3-5 days in the refrigerator. However, for the best texture and flavor, it’s recommended to enjoy it within the first couple of days.
– **Freezing Options and Tips for Thawing**: If you want to store the cake for an extended period, you can freeze it. To do so, slice the cake and wrap individual pieces tightly in plastic wrap, then place them in a freezer-safe container. When you’re ready to enjoy, thaw the cake in the refrigerator overnight.
### FAQ
**Can I use ripe bananas that are overripe?**
Yes! Overripe bananas are perfect for this recipe as they are sweeter and more flavorful. Just make sure they are not spoiled.
**What can I substitute for buttermilk?**
If you don’t have buttermilk on hand, you can make your own by adding one tablespoon of white vinegar or lemon juice to a cup of milk. Let it sit for about 5 minutes before using.
**How do I know when the cake is done baking?**
Insert a toothpick into the center of the cake; if it comes out clean or with a few crumbs attached, the cake is done.
**Can I make this cake ahead of time?**
Absolutely! In fact, making it a day ahead allows the flavors to meld beautifully. Just be sure to keep it refrigerated.
### Conclusion
Making a Banana Pudding Cake is not just about the ingredients and steps; it’s an experience that brings comfort and joy. This beloved dessert captures the essence of home baking, making it perfect for any occasion, from family gatherings to special celebrations. As you embark on your baking journey, don’t hesitate to experiment and enjoy the process. Embrace the deliciousness of this cake and the smiles it brings to those who share it with you. Happy baking!