

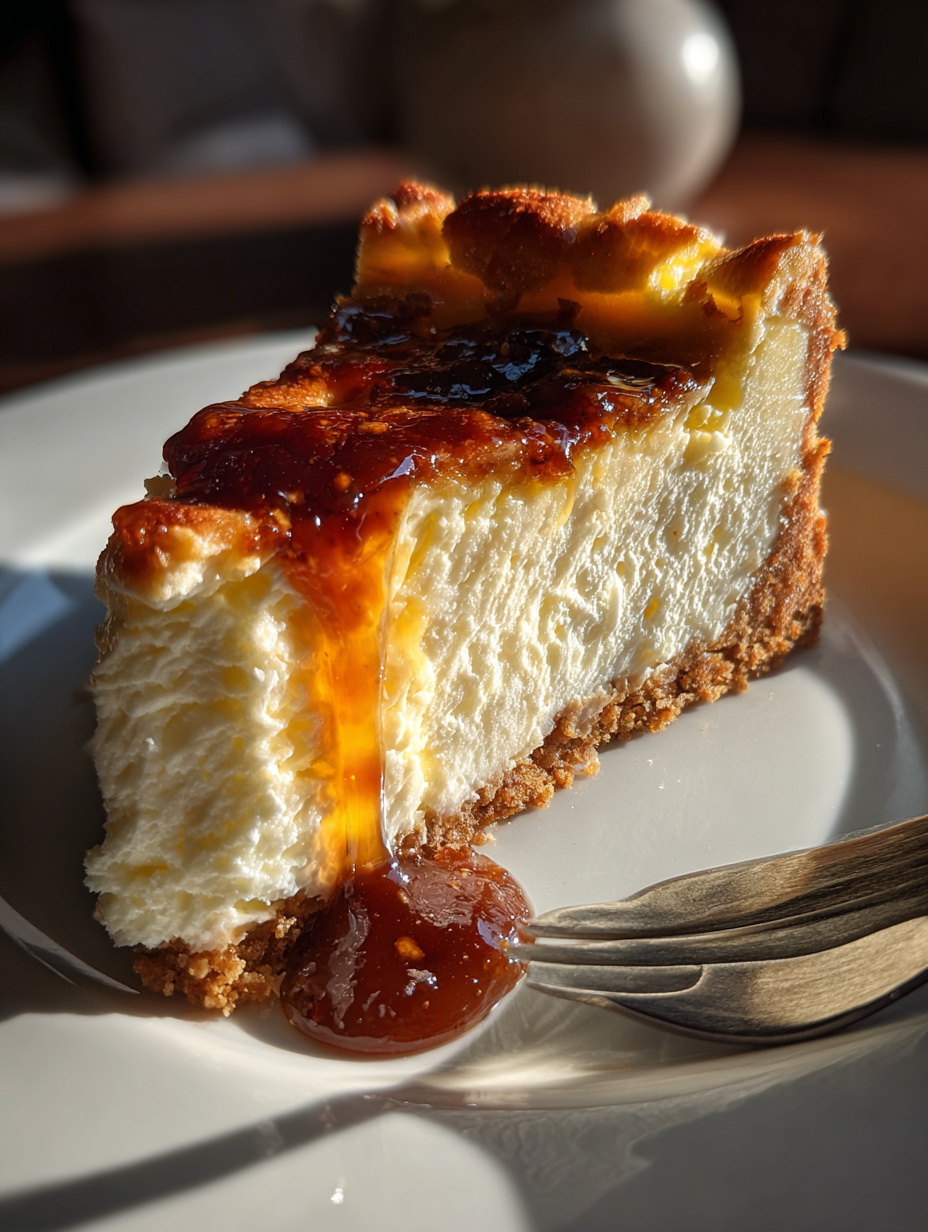
Indulge Guilt-Free: A Decadent Cheesecake Made Easy
—
Introduction
There’s something magical about the first bite of cheesecake—the way it melts in your mouth, combining creamy richness with a hint of sweetness. To me, cheesecake has always been more than just a dessert; it’s a celebration of moments. I vividly remember the summer evening when my grandmother invited me into her cozy kitchen, a place that felt like a treasure trove of culinary delights. The air was thick with the sweet aroma of brown sugar and vanilla, and the soft glow of kitchen lights made everything seem a little more dreamy.
As we whisked together the ingredients for her classic cheesecake, my fingers would get sticky with cream cheese, and laughter would bubble up as we tasted the batter, savoring the delicate balance of flavors. Yet, like many cherished recipes, I found that indulgence often came with a heavy dose of calories. Fast forward to today, as I sought a more health-conscious twist on that beloved dessert, I stumbled upon a Greek Yogurt Cheesecake recipe that promised all the lusciousness of cheesecake while keeping it low-calorie.
With just three simple ingredients, this cheesecake is not only easy to whip up but also reminds me of those warm, happy moments spent in my grandmother’s kitchen. The silky texture of non-fat Greek yogurt combined with light cream cheese creates a heavenly bite that’s light on your waistline but full of flavor. As the cheesecake bakes, it fills your home with a comforting aroma that beckons friends and family to gather around the table. So, let’s dive into this delightful recipe that captures the essence of those sweet summer evenings without the guilt.
—
Why This Recipe Works
At the heart of this Greek Yogurt Cheesecake lies the brilliant combination of flavors and textures that work in harmony to create a dessert that’s both satisfying and refreshing. The key players here—plain non-fat Greek yogurt, light cream cheese, and honey—each bring something unique to the table.
1. Flavor Harmony: The honey provides a natural sweetness that enhances the flavors of the yogurt and cream cheese without being overwhelming. As it melds with the vanilla extract and a hint of fresh lemon juice, you’ll experience a subtle complexity that elevates this cheesecake beyond the ordinary. This unique combination not only sweetens the batter but also brightens it, adding a refreshing zing that cuts through the creaminess.
2. Texture Contrast: Achieving that signature cheesecake texture is all about balance. The Greek yogurt contributes a light and airy quality that contrasts beautifully with the silkiness of the light cream cheese. The result is a cheesecake that feels indulgent yet light, making it perfect for any occasion. By using well-drained Greek yogurt, you ensure that the cheesecake sets properly, avoiding that dreaded watery texture.
3. Ingredient Roles: Each ingredient serves a specific purpose. The Greek yogurt provides protein and a tangy flavor, while the light cream cheese adds creaminess without the excess calories of traditional cream cheese. The honey not only sweetens but acts as a binding agent, helping the cheesecake maintain its structure.
4. A Healthier Twist: What sets this cheesecake apart from its heavier counterparts is the use of Greek yogurt, which is lower in calories and fat compared to cream cheese. This makes it a healthier option while still delivering on the taste you crave. Unlike many store-bought cheesecakes, you know exactly what’s going into this decadent dessert, allowing you to enjoy it without any guilt.
—
What Makes It Special
This Greek Yogurt Cheesecake isn’t just a lighter take on a classic dessert; it brings several unique qualities that set it apart:
– Simplicity: With only three main ingredients, this recipe is incredibly straightforward, making it a go-to for those last-minute dessert cravings or gatherings. Unlike many elaborate cheesecakes that require a long list of components and steps, this one minimizes fuss without sacrificing flavor.
– Freshness and Customization: Making this cheesecake at home means you can control the ingredients, ensuring freshness and quality. Plus, you can easily customize it to suit your taste. Whether you prefer a little extra sweetness or want to toss in some fresh berries for a burst of flavor, the possibilities are endless.
– Budget-Friendly: Compared to purchasing a cheesecake from a bakery or grocery store, making this cheesecake at home is a cost-effective option. You’re not only saving money but also creating a dessert that’s tailored to your palate.
– Guilt-Free Indulgence: With a significantly lower calorie count, this cheesecake allows you to indulge without the guilt. You can enjoy a slice or two, knowing that you’re treating yourself to something that fits into your healthy lifestyle.
—
Ingredient Breakdown
Now, let’s take a closer look at the ingredients that make this Greek Yogurt Cheesecake a standout:
1. Plain Non-Fat Greek Yogurt (2 cups): This is the star of the show! The Greek yogurt provides a creamy base and a delightful tang that balances the sweetness of the honey. It’s packed with protein, making this cheesecake a nutritious choice. It’s crucial to use well-drained yogurt to prevent a watery texture; this ensures your cheesecake sets perfectly. For a dairy-free option, you can substitute with a plant-based yogurt, such as coconut or almond yogurt.
2. Light Cream Cheese (1 cup): Softened at room temperature, light cream cheese contributes that classic cheesecake creaminess while keeping the calorie count in check. It blends beautifully with the Greek yogurt for a smooth, rich filling. If you’re looking for a dairy-free alternative, try using cashew cream or a vegan cream cheese.
3. Honey (1/4 cup): This natural sweetener not only adds sweetness but also enhances the overall flavor profile with its floral notes. If you prefer a vegan option, agave syrup works beautifully as a substitute. Adjust the amount of honey based on your personal preference for sweetness.
4. Vanilla Extract (1/2 teaspoon): A dash of vanilla extract elevates the flavor, infusing the cheesecake with warmth and richness. For a twist, try using almond extract instead for a unique flavor profile.
5. Fresh Lemon Juice (1 tablespoon): The acidity of freshly squeezed lemon juice brightens the entire dessert, adding a refreshing zing. It helps balance the richness of the cream cheese and yogurt while enhancing the overall taste. If fresh lemons aren’t available, bottled lemon juice can work in a pinch.
6. Graham Cracker Crumbs (optional): If you’re looking to create a crust for your cheesecake, graham cracker crumbs add a delightful crunch and texture. You can customize this crust to your liking by using crushed gluten-free cookies or even nut-based crusts.
By understanding the role of each ingredient, you can feel empowered to make substitutions and modifications that suit your dietary needs without compromising the delightful taste of this cheesecake.
—
Equipment Needed
To whip up your Greek Yogurt Cheesecake, you’ll need a few essential tools to ensure a smooth and successful baking experience:
– Mixing Bowl: A large mixing bowl is crucial for combining your ingredients. Opt for a glass or stainless steel bowl for easy cleaning and durability.
– Hand Mixer or Whisk: While a hand mixer makes the job quicker and easier, a good old-fashioned whisk works just as well for mixing the cheesecake batter. Choose whichever you feel most comfortable with!
– Spatula: A silicone spatula is perfect for scraping down the sides of the bowl and smoothing the cheesecake mixture in the springform pan.
– 9-Inch Springform Pan: This is essential for baking your cheesecake. The removable sides make it easy to release the cheesecake without damaging it. If you don’t have a springform pan, a regular pie dish will work, but you may need to chill the cheesecake longer before serving.
– Parchment Paper (optional): Lining the bottom of your springform pan with parchment paper can help in releasing the cheesecake easily after baking. This is especially helpful if you’re concerned about sticking.
– Oven: Preheating your oven to 325°F (163°C) is important to achieve the right texture. Be sure to check that your oven is calibrated correctly for even baking.
These tools will make the process smoother and more enjoyable, allowing you to focus on the delicious outcome of your culinary adventure. Remember, some of these tools can be more affordable alternatives, so don’t hesitate to get creative with what you have on hand!
Step-by-Step Instructions

1. Prepare Your Ingredients
Start by gathering all your ingredients: 2 cups of plain non-fat Greek yogurt, 1 cup of light cream cheese, 1/4 cup of honey, 1/2 teaspoon of vanilla extract, and 1 tablespoon of fresh lemon juice. Ensure your cream cheese is softened to room temperature, which makes it easier to blend smoothly with the yogurt. Take a moment to appreciate the creamy texture of the yogurt and the rich, tangy aroma of the cream cheese. This sets the stage for a delightful cheesecake!
2. Mix the Cheesecake Base
In a mixing bowl, combine the Greek yogurt, softened cream cheese, honey, vanilla extract, and lemon juice. Using a hand mixer or a whisk, blend these ingredients on medium speed until you achieve a smooth and creamy consistency. This should take about 2-3 minutes. Chef’s Note: Scrape down the sides of the bowl halfway through mixing to ensure everything is well incorporated. You’ll know it’s ready when the mixture is velvety and uniform, with no lumps remaining.
3. Preheat the Oven
As you mix the cheesecake base, preheat your oven to 325°F (163°C). This temperature is ideal for baking the cheesecake gently, ensuring it sets without cracking. The warm air will also help develop a lovely texture. The moment you hear the preheating beep, you’ll know you’re on the right track.
4. Prepare the Springform Pan
While the oven heats up, take a 9-inch springform pan and lightly grease it with butter or a non-stick spray. For added insurance against sticking, line the bottom with parchment paper. This step is crucial because it allows for easy removal of the cheesecake without compromising its shape. Visually check that the edges are well greased; this will prevent any unsightly sticking later.
5. Transfer the Mixture
Pour the cheesecake mixture into the prepared springform pan. Use a spatula to smooth the top, ensuring an even surface. If you’re adding graham cracker crumbs for texture, sprinkle them evenly over the top of the cheesecake mixture. This adds a delightful crunch that contrasts beautifully with the creamy filling. Allow yourself to savor the sweet scent as you pour in the mixture—it’s a prelude to the deliciousness that awaits!
6. Bake the Cheesecake
Place the springform pan in the preheated oven and bake for 25 minutes. You’ll want to keep an eye on it as it bakes; the edges should appear set while the center remains slightly jiggly. This is a good sign that it will firm up as it cools. When the timer goes off, your kitchen will be filled with a heavenly aroma—this is the moment you’ve been waiting for!
7. Cool and Chill
Once baked, remove the cheesecake from the oven and let it cool at room temperature for about 30 minutes. This gradual cooling helps prevent cracks. After cooling, refrigerate the cheesecake for at least 2 hours (or preferably overnight) to allow it to set completely. When you take it out of the refrigerator, the texture should be firm yet creamy, and it should hold its shape beautifully when sliced.
Pro Tips for the Best Results
1. Choose Quality Yogurt
Opt for a high-quality, well-drained Greek yogurt. The texture and flavor of the yogurt will significantly influence the final product. Look for brands that specify “strained” on the label for the best results.
2. Room Temperature Cream Cheese
Ensure your cream cheese is fully softened at room temperature before mixing. This prevents lumps from forming in your cheesecake and allows for a smooth blend. Chef’s Note: If you’re in a hurry, you can cut the cream cheese into small cubes and microwave it for about 10-15 seconds.
3. Monitor Baking Time
Every oven is different, so check your cheesecake a few minutes before the suggested baking time. If the edges are set but the center is still jiggly, it’s done. Overbaking can lead to a dry texture, so it’s better to err on the side of caution.
4. Cool Gradually
Allowing the cheesecake to cool gradually at room temperature before refrigerating helps prevent cracks. Rapid temperature changes can shock the cheesecake and create a less appealing texture.
5. Use Fresh Lemon Juice
Freshly squeezed lemon juice enhances the flavor profile significantly compared to bottled juice. The brightness of the fresh juice balances the richness of the cream cheese and yogurt, resulting in a well-rounded taste.
6. Chill Overnight for Best Results
For optimal firmness and flavor, let the cheesecake chill overnight. This extra time allows the flavors to meld beautifully, making each bite a creamy delight.
7. Experiment with Sweeteners
Feel free to adjust the amount of honey according to your taste preference. If you prefer a sweeter cheesecake, add a bit more honey, but be cautious not to make it overly sweet, as this can mask the tanginess of the yogurt.
Common Mistakes to Avoid
1. Using Cold Cream Cheese
Mistake: Starting with cold cream cheese can lead to lumps in your mixture.
Why it ruins the dish: Chunks of cold cream cheese do not blend well and create an uneven texture.
Correct approach: Always let cream cheese sit at room temperature for at least 30 minutes before starting.
2. Overmixing the Batter
Mistake: Mixing the ingredients too vigorously can incorporate too much air.
Why it ruins the dish: Overmixing can cause the cheesecake to puff up and crack during baking.
Correct approach: Mix just until combined and smooth—stop as soon as there are no lumps.
3. Not Preheating the Oven
Mistake: Skipping the preheating process or not waiting long enough can affect baking times.
Why it ruins the dish: An oven that isn’t hot enough may lead to uneven cooking.
Correct approach: Preheat the oven for at least 15-20 minutes before starting to bake.
4. Skipping the Cooling Period
Mistake: Not allowing the cheesecake to cool gradually before refrigerating.
Why it ruins the dish: Rapid cooling can cause cracks and an undesirable texture.
Correct approach: Let it cool at room temperature for 30 minutes before placing it in the fridge.
5. Not Greasing the Pan
Mistake: Forgetting to grease or line the springform pan.
Why it ruins the dish: The cheesecake may stick to the pan, making it difficult to remove without damaging it.
Correct approach: Always grease the pan and consider using parchment paper on the bottom for easy release.
6. Using Bottled Lemon Juice
Mistake: Using bottled lemon juice instead of fresh.
Why it ruins the dish: Bottled juice lacks the bright flavor and acidity of fresh juice, leading to a bland cheesecake.
Correct approach: Always use freshly squeezed lemon juice for the best flavor enhancement.
Creative Variations
1. Seasonal Berry Bliss
Top your cheesecake with a fresh berry compote made from strawberries, blueberries, or raspberries. Simply simmer one cup of the berries with a tablespoon of honey until they soften, then cool before adding on top for a burst of fruitiness.
2. Vegan Delight
Substitute the light cream cheese with a dairy-free alternative made from cashews or tofu. Use maple syrup instead of honey for sweetness, and ensure the Greek yogurt is replaced with a suitable plant-based yogurt. This way, you can enjoy a vegan-friendly version without losing the creamy texture.
3. Lemon Blueberry Gourmet
For a gourmet twist, add 1/2 cup of lemon zest and 1 cup of fresh blueberries into the cheesecake mixture. The citrus notes enhance the flavor depth, while the berries provide a delightful burst of sweetness in each bite.
4. Quick 15-Minute No-Bake Version
If you’re pressed for time, skip the baking altogether! Just mix the ingredients and spread them into a prepared crust (store-bought graham cracker crust works well). Chill for about an hour, and you’ll have a quick cheesecake ready to serve.
5. Chocolate Swirl Kid-Friendly Version
For a kid-approved treat, mix in 1/4 cup of cocoa powder into half of the cheesecake mixture. Swirl it into the plain mixture before pouring it into the pan for a stunning marbled effect that appeals to young palates.
6. Tropical Coconut Twist
Incorporate 1/2 cup of shredded coconut and 1/4 cup of coconut cream into the mixture. This will give your cheesecake a delightful tropical flavor, perfect for summer gatherings. Top it off with toasted coconut flakes for added texture and flavor.
Serving Ideas
When it comes to serving your Greek Yogurt Cheesecake, presentation can elevate this simple dessert into something truly memorable. Here are some beautiful ways to plate and serve it:
1. Berry Topping: Top each slice with a medley of fresh berries—think vibrant strawberries, blueberries, and raspberries. The bright colors not only create a stunning contrast against the creamy cheesecake but also add a burst of freshness.
2. Mint Garnish: For a pop of color and a hint of freshness, place a small sprig of mint on top of each slice. This simple touch can make your cheesecake look gourmet and inviting.
3. Drizzle of Honey: For an extra touch of sweetness, drizzle a bit of honey or agave syrup over the cheesecake just before serving. Not only does this enhance the flavor, but it also creates a visually appealing sheen.
4. Layered Presentation: If you’re feeling particularly creative, consider serving the cheesecake in individual dessert glasses. Layer the cheesecake with crushed graham crackers and fresh fruit to create a visually striking dessert that is as delightful to eat as it is to look at.
5. Dusting of Cocoa or Cinnamon: For a sophisticated touch, lightly dust the top of the cheesecake with cocoa powder or ground cinnamon before serving. This adds depth to the flavor profile and looks enticing on the creamy surface.
Aim for a portion size of about 1/8 of the cheesecake per serving, ensuring that each person gets a satisfying slice, complemented by your beautiful garnishes.
What to Serve With
Pairing your Greek Yogurt Cheesecake with complementary dishes can elevate your dessert experience. Here are some delightful suggestions:
1. Herbal Iced Tea: A refreshing herbal iced tea, perhaps with hints of mint or chamomile, balances the creamy sweetness of the cheesecake and cleanses the palate.
2. Lemon Sorbet: The zesty brightness of lemon sorbet contrasts perfectly with the rich texture of the cheesecake, providing a refreshing interlude between bites.
3. Chocolate-Covered Almonds: The nutty crunch of chocolate-covered almonds offers a delightful textural contrast to the smooth cheesecake, making each bite more interesting.
4. Simple Green Salad: A light salad dressed with a vinaigrette can serve as a refreshing counterpoint to the richness of the dessert. The acidity in the dressing will help balance the sweetness.
5. Espresso or Coffee: A strong shot of espresso or a well-brewed cup of coffee pairs beautifully, creating a harmonious balance between the cheesecake’s sweetness and the coffee’s robust flavors.
6. Fruit Platter: A platter of sliced seasonal fruits adds a colorful, healthy touch to your dessert spread, enhancing the overall aesthetic while providing a refreshing bite that contrasts with the cheesecake’s creaminess.
Storage Guide
To keep your Greek Yogurt Cheesecake fresh and delicious, proper storage is key. Here’s how to do it:
– Container: Use an airtight container made of glass or plastic to store your cheesecake. If you don’t have one, wrap it tightly in plastic wrap, ensuring no air can seep in.
– Temperature: Store your cheesecake in the refrigerator at a temperature of 35°F to 40°F (1.7°C to 4.4°C).
– Duration: This cheesecake will keep well in the fridge for up to 3 days. After that, you may start to notice a decline in texture and flavor.
– Signs of Spoilage: Look for signs such as an off smell, changes in texture, or discoloration on the surface. If it develops an unusual appearance or odor, it’s best to discard it.
– Refreshing Before Serving: To restore freshness before serving leftover cheesecake, let it sit at room temperature for about 15 minutes. This allows the flavors to awaken. You can also add a drizzle of honey or fresh fruit just before serving to liven it up.
Freezing Tips
If you want to save some of your Greek Yogurt Cheesecake for later, freezing is a great option:
– Freezing Suitability: This cheesecake can be frozen, but the texture may change slightly upon thawing due to the yogurt content.
– Portioning: Cut the cheesecake into individual slices before freezing. This makes it easier to thaw just what you need later.
– Wrapping Method: Wrap each slice tightly in plastic wrap, then place in a freezer-safe bag or container to prevent freezer burn. Make sure to label the bags with the date.
– Shelf Life: It can be stored in the freezer for up to 2 months.
– Quality After Thawing: Expect a slight change in texture; it may not be as creamy as when fresh, but it will still taste delicious.
– Best Thawing Method: To thaw, place the slices in the refrigerator overnight. This gradual thawing helps maintain as much of the original texture as possible.
Reheating Guide
If you find yourself with leftover Greek Yogurt Cheesecake that you want to enjoy warm, here are some reheating methods:
– Microwave: Place a slice on a microwave-safe plate and cover it with a damp paper towel to prevent drying out. Heat on medium power for about 15-20 seconds. Check to see if it’s warmed through without overheating, which can alter its texture.
– Oven: Preheat your oven to 300°F (150°C). Place the cheesecake on a baking sheet and cover it loosely with aluminum foil to keep it from drying out. Heat for 10-15 minutes or until warmed through.
– Stovetop: Place a slice in a small pan over low heat. Add a splash of milk or cream to keep it moist. Heat gently for about 5 minutes, flipping once.
– Restoring Texture and Flavor: Regardless of the method, serve it immediately after reheating and consider drizzling with honey or fresh fruit to bring back its delightful flavors.
Nutrition Overview
When you indulge in this Greek Yogurt Cheesecake, you can enjoy it guilt-free, as it’s made with wholesome ingredients. Here’s a breakdown of approximate nutritional values per serving:
– Calories: 150
– Protein: 10g
– Carbohydrates: 18g
– Fat: 5g
– Fiber: 0g
– Sugar: 10g
The Greek yogurt provides a fantastic source of protein and probiotics, promoting gut health. The honey not only sweetens the cheesecake but also offers antioxidants, making your dessert not just delicious but also nutritious. Plus, the use of light cream cheese keeps the fat content lower, so you can enjoy this treat without feeling weighed down.
Frequently Asked Questions
Q: Can I substitute regular cream cheese instead of light cream cheese?
A: Absolutely! You can use regular cream cheese, but keep in mind that it will increase the calorie and fat content of your cheesecake. If you’re looking for a lighter option, stick with the light cream cheese.
Q: Can I use a non-dairy yogurt for this recipe?
A: Yes! If you need a dairy-free option, you can substitute with a non-dairy Greek yogurt. Just ensure it has a similar texture and consistency for the best results.
Q: How can I make this cheesecake gluten-free?
A: To make your cheesecake gluten-free, skip the graham cracker crust or use gluten-free graham crackers. The cheesecake itself is already gluten-free!
Q: How long should I bake the cheesecake?
A: Bake your cheesecake for about 25 minutes at 325°F (163°C). The key is to watch for the edges to be set while the center remains slightly jiggly.
Q: Can I add fruit to the mixture?
A: Yes! You can fold in fresh fruit like blueberries or strawberries into the cheesecake mixture before baking for added flavor.
Q: How should I store leftover cheesecake?
A: Store leftover cheesecake in an airtight container in the refrigerator for up to 3 days. You can also freeze it for up to 2 months if you want to enjoy it later.
Q: What kitchen equipment do I need to make this cheesecake?
A: All you need is a mixing bowl, a hand mixer or whisk, a measuring cup, and a 9-inch springform pan to bake the cheesecake.
Q: Can I make this cheesecake ahead of time?
A: Absolutely! This cheesecake can be made a day in advance, making it a perfect dessert for gatherings. Just remember to refrigerate it until serving.
Final Thoughts
Making your own Greek Yogurt Cheesecake is not only simple but incredibly satisfying. Remember, the key to a creamy texture lies in using well-drained Greek yogurt and allowing the cheesecake to set properly in the fridge. I genuinely hope you enjoy every bite of this delightful dessert that doesn’t compromise on flavor while keeping things light.
I can’t wait for you to make this cheesecake and see how it turns out! Don’t forget to share your results and any variations you might try. Dive into this deliciousness and treat yourself to a slice of happiness today!
Greek Yogurt Cheesecake Recipe (Low Calorie 3 Ingredient) 🍰🥄
Ingredients
- 2 cups plain non-fat Greek yogurt make sure it's well-drained
- 1 cup light cream cheese softened at room temperature
- 1/4 cup honey or agave syrup for sweetness
- 1/2 teaspoon vanilla extract for flavor enhancement
- 1 tablespoon lemon juice freshly squeezed
- graham cracker crumbs for crust, optional and to taste
Instructions
- In a mixing bowl, combine the plain non-fat Greek yogurt, softened light cream cheese, honey, vanilla extract, and lemon juice. Use a hand mixer or whisk to blend until the mixture is smooth and creamy.
- Preheat the oven to 325°F (163°C). Prepare a 9-inch springform pan by lightly greasing it or lining the bottom with parchment paper.
- Pour the cheesecake mixture into the prepared springform pan, smoothing the top with a spatula. If using, sprinkle graham cracker crumbs evenly over the top for added texture.
- Bake in the preheated oven for 25 minutes or until the edges are set but the center is slightly jiggly. Remove from the oven and let it cool to room temperature.
- Once cooled, refrigerate the cheesecake for at least 2 hours (or overnight) to allow it to set completely before serving.
Notes
Tip 2: This cheesecake can be made ahead and stored in the refrigerator for up to 3 days.
Variation: Add fresh berries or a fruit compote on top for a fruity twist.