

Indulge in Decadence: A Simple, Egg-Free Chocolate Mousse that Delights
—
Introduction
There’s a certain magic that fills the air when chocolate is involved. I remember the first time I whipped up a batch of this chocolate mousse in my small kitchen, the sun streaming through the window as I melted the semi-sweet chocolate chips. The rich, deep aroma of chocolate filled the space, wrapping around me like a warm hug. It was a chilly winter evening, and I wanted to create something special for my family. Just the thought of a silky, creamy mousse was enough to make my heart race with anticipation.
As I whipped the heavy cream, the sound of the mixer produced a gentle whoosh, and I couldn’t help but sneak a taste of the smooth, glossy chocolate mixture that started to come together. Each fold of the whipped cream into the chocolate felt like magic; the way the airy peaks danced and married with the dark chocolate was a beautiful sight. The colors were a luscious blend of dark brown and cream, and the texture was light yet indulgent.
This recipe quickly became a favorite in my household, not just for its simplicity but for the way it effortlessly impresses. It’s the dessert you can whip up in mere moments, yet it tastes like you spent hours crafting it. With just four ingredients, this egg-free, no-bake wonder is perfect for any occasion, from an impromptu gathering to a special celebration. And trust me, once you take a spoonful of this chocolate mousse, you’ll understand why it became my go-to sweet treat. Now, let’s dive into how you can create this delightful dessert right in your own kitchen!
—
Why This Recipe Works
The beauty of this chocolate mousse lies in its simplicity, relying on just a few key ingredients to create a dessert that’s both luxurious and accessible. The combination of heavy cream and semi-sweet chocolate chips forms the foundation of this recipe. When whipped, the cream incorporates air, creating a light and airy texture that contrasts beautifully with the smooth, dense chocolate.
Heavy cream is crucial; its high fat content not only allows you to achieve those soft peaks when whipped but also contributes to the mousse’s rich mouthfeel. The semi-sweet chocolate brings depth and a perfect balance of sweetness, while the powdered sugar adds just enough sweetness without overpowering the chocolate flavor. It dissolves easily, ensuring a smooth texture, while the vanilla extract introduces a warm, aromatic note that enhances the overall flavor profile.
What sets this recipe apart from generic versions is its lack of eggs and the absence of any baking time. This makes it not only quicker to prepare but also safer for those with egg allergies or dietary restrictions. You’re left with a chocolate mousse that’s rich, creamy, and effortlessly elegant—perfect for any occasion, yet simple enough for a weeknight treat. With just four ingredients, you can create a dessert that feels indulgent without the fuss, making it a reliable go-to in your culinary repertoire.
—
What Makes It Special
This chocolate mousse recipe stands out because of its remarkable simplicity and the luxurious experience it provides. Here are a few unique qualities that make this version truly special:
– Minimal Ingredients, Maximum Flavor: Unlike many store-bought or restaurant versions that may contain artificial flavors or stabilizers, this mousse is made with wholesome ingredients. You can taste the quality of each component, as every spoonful offers a genuinely rich chocolate experience.
– Customization at Your Fingertips: Making this mousse at home allows you to experiment with flavors. Want to add a hint of espresso or a splash of orange zest? You can easily tailor it to suit your palate. In contrast, pre-packaged desserts often lack this level of personalization.
– Oh-So-Fresh: There’s nothing quite like a freshly made mousse that has been chilled just before serving. The texture is light, airy, and incredibly smooth, far surpassing any pre-made option found in stores. You’ll find that the freshness elevates the entire dessert experience.
– Garnish Potential: The sky’s the limit when it comes to garnishing your mousse! The addition of cocoa powder and chocolate shavings adds a professional touch, making it visually stunning and deliciously rich.
With all these factors combined, it’s easy to see why this chocolate mousse is a beloved recipe that continues to be a favorite in my home and will surely find a place in yours.
—
Ingredient Breakdown
Let’s take a closer look at each ingredient in this chocolate mousse and the role they play in crafting this elegant dessert:
– 1 cup Heavy Whipping Cream: The star of the show! The high fat content in heavy cream allows it to whip up beautifully, adding both volume and richness to the mousse. For the best results, ensure your cream is very cold; this helps achieve those fluffy peaks.
– 1/2 cup Semi-Sweet Chocolate Chips: This is where the chocolatey goodness comes from. Melting the chips before folding them into the whipped cream ensures a smooth and cohesive mixture. If you prefer a different flavor, feel free to use dark chocolate for a more intense experience or milk chocolate for a sweeter, creamier taste.
– 1/4 cup Powdered Sugar: This ingredient sweetens the mousse without the graininess of granulated sugar. Sifting it before adding prevents lumps and ensures a silky smooth texture. If you’re looking for a sugar-free alternative, you can use a sugar substitute that measures cup-for-cup.
– 1 teaspoon Vanilla Extract: A splash of vanilla elevates the mousse, adding warmth and depth to the chocolate flavor. If you want to switch things up, consider using almond extract or even a splash of espresso to create a mocha-infused version.
– 1/2 cup Milk (optional): This is used to thin the mousse if it becomes too thick. Depending on your desired consistency, you might not need to add the full amount. For a dairy-free alternative, use almond milk or coconut milk.
– 1 tablespoon Cocoa Powder (for garnish): Just a dusting on top before serving adds a rich chocolate flavor and an elegant, finished look.
– Chocolate Shavings (for garnish): These not only enhance the visual appeal of your mousse but add an extra layer of chocolatey goodness. You can make your own using a vegetable peeler on a chocolate bar or purchase pre-made shavings from the store.
Whether you’re preparing this mousse for a special occasion or simply to satisfy a chocolate craving, understanding the role of each ingredient will help you appreciate the deliciousness that awaits.
—
Equipment Needed
To create this delightful chocolate mousse, you’ll need a few essential tools:
– Mixing Bowls: You’ll need at least two mixing bowls—one for whipping the cream and another for combining the chocolate and sugar. Opt for glass or stainless steel bowls, as they hold temperature well and won’t react with the ingredients.
– Electric Mixer: A hand mixer or stand mixer is essential for whipping the cream to those light and fluffy soft peaks. If you don’t have an electric mixer, you can whisk by hand, but be prepared for a bit of a workout!
– Spatula: A rubber spatula is perfect for gently folding the whipped cream into the chocolate mixture. This ensures you maintain the airiness of the cream while combining the ingredients smoothly.
– Measuring Cups and Spoons: Accurate measurements are key to achieving the perfect mousse. Make sure you have a set of dry measuring cups for the solid ingredients and liquid measuring cups for the cream and milk.
– Chilling Containers: Use small serving glasses, bowls, or ramekins for serving. They not only look great but also help with portion control!
– Sifter: If you don’t have a sifter, a fine-mesh strainer can work for sifting the powdered sugar and cocoa powder, ensuring a lump-free mixture.
While these are the essential tools for making your chocolate mousse, don’t hesitate to get creative with your serving vessels. The right presentation can elevate this simple dessert into something truly special!
Step-by-Step Instructions
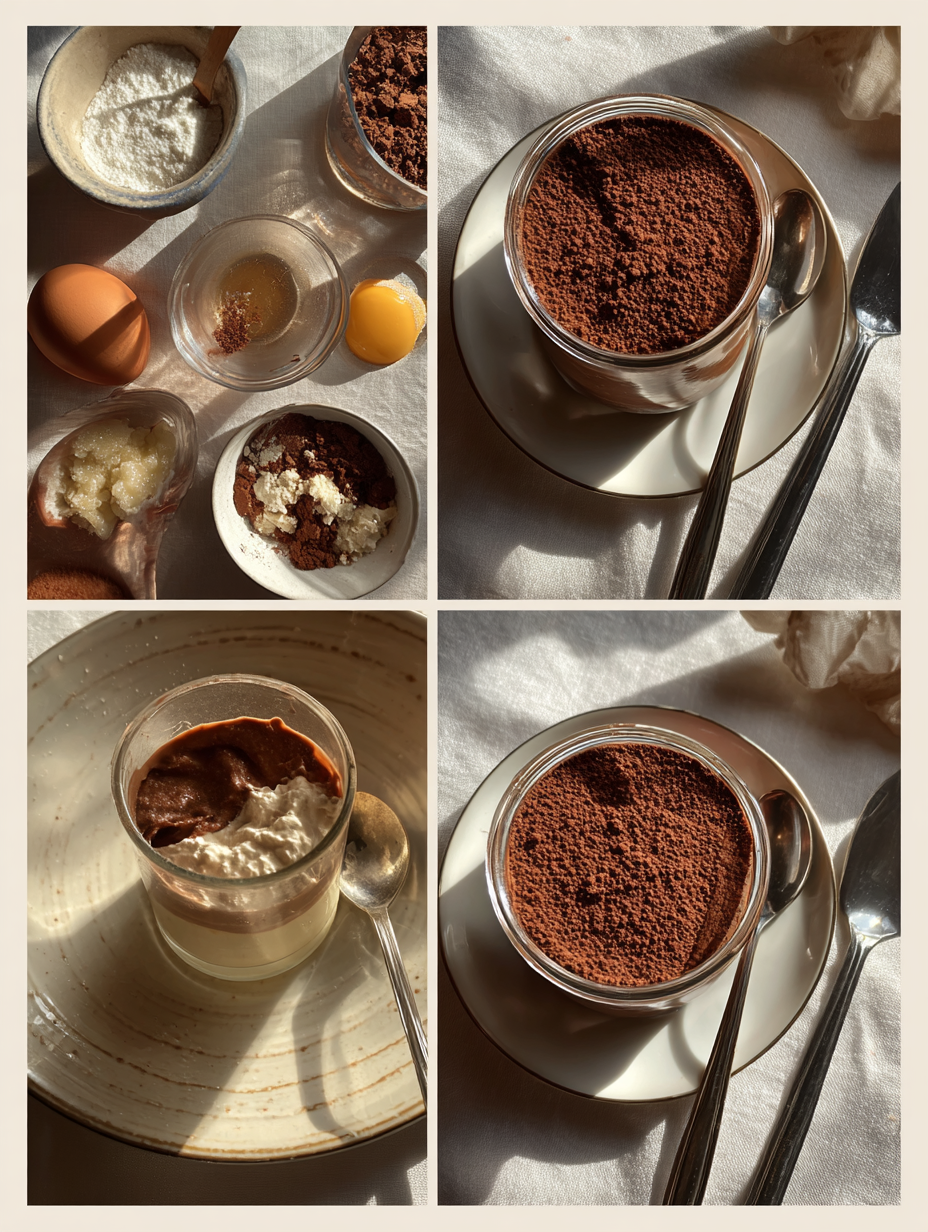
1. Prepare Your Ingredients: Gather all your ingredients — 1 cup of chilled heavy whipping cream, 1/2 cup of semi-sweet chocolate chips, 1/4 cup of sifted powdered sugar, and 1 teaspoon of vanilla extract. Make sure your heavy cream is very cold; this will help it whip up beautifully. If you can, chill your mixing bowl and beaters in the freezer for about 10 minutes before starting for an extra boost.
2. Whip the Heavy Cream: In your chilled mixing bowl, pour in the heavy whipping cream. Using an electric mixer, whip the cream on medium-high speed. You’ll want to whip it until soft peaks form, which should take about 3-5 minutes. Look for a consistency where the cream holds its shape but still has a slight jiggle. Be careful not to overwhip; you don’t want it to turn grainy.
Chef’s Note: If you’re unsure, stop the mixer and check. Soft peaks should gently curve over when you lift the beaters.
3. Melt the Chocolate: In a separate microwave-safe bowl, place your semi-sweet chocolate chips. Heat them in the microwave in 20-second intervals, stirring in between until fully melted and smooth. Let the melted chocolate cool slightly; it shouldn’t be hot when you mix it with the cream, or it could cause the whipped cream to deflate.
Chef’s Note: If you don’t have a microwave, you can also melt chocolate using a double boiler on the stovetop, stirring continuously until smooth.
4. Combine Chocolate and Sugar: Once the chocolate has cooled, add the sifted powdered sugar to the melted chocolate. Whisk this together until combined and smooth. Add in the vanilla extract and stir until everything is well incorporated. You should have a glossy chocolate mixture that smells heavenly.
5. Fold the Whipped Cream into the Chocolate: Now it’s time to combine the chocolate with the whipped cream. Take a spatula and gently fold one-third of the whipped cream into the chocolate mixture. Use a gentle motion to avoid deflating the whipped cream. Repeat this process in two more additions until you have a smooth, uniform mixture.
Chef’s Note: Folding means you should lift the mixture from the bottom and gently turn it over. It’s a delicate process, so take your time.
6. Adjust the Consistency: Check the consistency of your mousse. If it feels too thick, gradually add milk while folding until you reach your desired consistency. The mousse should be silky but still hold its shape when spooned into serving dishes.
7. Chill the Mousse: Spoon the mousse into your serving glasses or bowls. Cover them with plastic wrap and place them in the refrigerator for at least 25 minutes to allow the mousse to set. The chilling will deepen the flavors and give the mousse a luscious texture.
8. Garnish and Serve: Once set, it’s time to serve! Dust the tops with a sprinkle of cocoa powder and add some chocolate shavings for an elegant touch. You’re now ready to enjoy this rich, creamy, and utterly delightful dessert.
Pro Tips for the Best Results
1. Use Cold Ingredients: Starting with cold heavy cream is crucial for achieving the right texture. The colder the cream, the more stable the whipped peaks will be, ensuring a light, airy mousse.
2. Sift Your Sugar: Always sift your powdered sugar before adding it to the chocolate. This removes lumps and creates a smoother texture in your mousse, preventing any gritty bites.
3. Avoid Overwhipping: Keep a close eye on your whipped cream. Overwhipping can turn the cream into butter, ruining the light texture of your mousse. Stop whipping as soon as you see soft peaks.
4. Be Patient with Folding: When folding the whipped cream into the chocolate, take your time. A gentle touch is essential to keep the air in the whipped cream, which gives the mousse its light and airy quality.
5. Chill Properly: Allow your mousse to chill for at least 25 minutes, but if you can, let it sit longer. The flavors meld beautifully over time, and the texture improves as it sets.
6. Experiment with Flavors: Don’t hesitate to infuse flavors into your chocolate mixture. A tablespoon of espresso powder or a splash of orange zest can elevate your mousse to new heights.
7. Presentation Matters: Use clear serving glasses to show off the beautiful layers. You can also layer your mousse with whipped cream or fruits for a stunning presentation.
Common Mistakes to Avoid
1. Using Warm Chocolate: If you add hot chocolate to the whipped cream, it will melt the cream and ruin the texture. Always let the chocolate cool slightly before mixing.
2. Not Sifting Powdered Sugar: Skipping the sifting step can lead to lumps of sugar in your mousse, which will create an undesirable texture. Always sift to ensure a smooth consistency.
3. Overwhipping the Cream: Whipping cream too long can turn it into butter, resulting in a dense mousse that lacks the lightness you’re aiming for. Watch closely and stop at soft peaks.
4. Folding Incorrectly: If you mix too vigorously while folding, you risk deflating the whipped cream. Always fold gently to maintain the airy texture.
5. Skipping the Chill Time: Not allowing your mousse to set in the fridge can lead to a runny consistency that won’t hold its shape. Make sure to chill it for the recommended time.
6. Ignoring Ingredient Temperatures: Using ingredients at room temperature, especially heavy cream, can lead to poor results. Always start with cold cream for the best whipping.
Creative Variations
1. Seasonal Variation: Pumpkin Spice Mousse: Add 1/2 cup of pure pumpkin puree and 1 teaspoon of pumpkin pie spice to the chocolate mixture. This variation is perfect for fall and brings a cozy flavor to your chocolate mousse.
2. Dietary-Friendly Version: Vegan Chocolate Mousse: Replace the heavy whipping cream with coconut cream (chill a can of full-fat coconut milk overnight and scoop out the solid cream). Use dairy-free chocolate chips for a rich, creamy vegan dessert.
3. Gourmet Elevated Version: Sea Salt Caramel Chocolate Mousse: Drizzle in 1/4 cup of homemade or store-bought caramel sauce into the chocolate mixture before folding in the cream. Finish with a sprinkle of flaky sea salt on top for a sophisticated touch.
4. Quick 15-Minute Version: Instant Chocolate Mousse: Use whipped topping (like Cool Whip) instead of whipping your own cream. Simply fold the whipped topping with melted chocolate and powdered sugar, and chill for 15 minutes for a quicker fix.
5. Kid-Friendly Version: Chocolate Peanut Butter Mousse: Stir in 1/4 cup of creamy peanut butter to the melted chocolate mixture. This adds a fun twist that kids will love, creating a rich and nutty flavor.
6. International Twist: Mexican Chocolate Mousse: Add 1 teaspoon of cinnamon and a pinch of cayenne pepper to the melted chocolate mixture for a warm, spicy kick. This variation honors the traditional Mexican flavors and adds depth to your mousse.
Serving Ideas
When it comes to presenting your chocolate mousse, the goal is to elevate its rich, creamy nature while tantalizing the eye. Here are a few inspiring serving ideas:
1. Layered Elegance: Use clear glass cups or dessert jars to showcase the mousse’s depth. Spoon in layers of mousse and top with a sprinkle of crushed cookies or graham crackers for added texture. A layer of fresh raspberries can introduce a pop of color and tang.
2. Chocolate-Dipped Accents: Dip fresh strawberries or pretzels in melted chocolate and allow them to set. Stand a few of these delightful treats upright in the mousse before serving. The combination of sweet and savory will add an appealing contrast.
3. Whipped Cream Clouds: For an extra creamy finish, top each serving with a dollop of freshly whipped cream. Consider dusting the whipped cream with cocoa powder or a drizzle of chocolate sauce for that extra touch of decadence.
4. Garnish Galore: Sprinkle shaved chocolate or chocolate curls generously over the mousse. Add a few mint leaves for a vibrant green touch and a refreshing scent.
5. Individual Portions: Serve in small, elegant ramekins for a more intimate dessert experience. You can even pair each ramekin with a tiny spoon for a charming touch. Remember, smaller portions allow your guests to indulge without feeling overwhelmed.
Each of these serving ideas not only enhances the presentation but also invites your guests to dig in and enjoy the luxurious experience of your chocolate mousse.
What to Serve With
Pairing your chocolate mousse with complementary dishes elevates the entire dining experience. Here are some delightful pairings to consider:
1. Espresso or Coffee: A rich cup of espresso or a smooth latte pairs beautifully with chocolate mousse. The bitterness of the coffee balances the sweetness of the mousse, offering a delightful contrast that enhances the chocolate flavor.
2. Raspberry Sorbet: The icy, tart profile of raspberry sorbet offers a refreshing counterpoint to the creamy richness of the mousse. The vibrant color also adds visual appeal to your dessert table.
3. Cheese Platter: Serve a selection of mild cheeses like brie or mascarpone alongside your mousse. The creamy texture of the cheese complements the mousse, while the saltiness acts as a savory counterbalance.
4. Chocolate Chip Cookies: A warm, freshly baked chocolate chip cookie adds a delightful crunch and extra chocolatey goodness. The contrasting textures of creamy mousse and chewy cookies create a satisfying experience.
5. Salty Caramel Sauce: Drizzle a bit of homemade or store-bought caramel sauce on top of your mousse. The saltiness of the caramel cuts through the richness of the chocolate, enhancing the overall flavor profile.
6. Fresh Fruit Salad: A medley of seasonal fruits like strawberries, blueberries, and kiwi provides a refreshing, light contrast to the heavy mousse. The natural sweetness of the fruits harmonizes beautifully with the dessert.
These pairings not only complement the chocolate mousse but create a multi-layered experience that your guests will remember.
Storage Guide
To store any leftover chocolate mousse properly, follow these guidelines:
– Container: Use an airtight container, preferably glass, to preserve the mousse’s texture and prevent it from absorbing any odors from your refrigerator.
– Temperature: Keep the mousse in the refrigerator at a consistent temperature of 34°F to 40°F (1°C to 4°C).
– Shelf Life: The mousse will stay fresh for up to 3 days. After that, it may begin to lose its creamy texture and flavor.
– Signs of Spoilage: If you notice an off smell, changes in texture, or any separation, it’s best to discard the mousse.
– Refreshing Before Serving: If you find that the mousse has thickened in the fridge, gently fold in a tablespoon of heavy cream or milk to restore its original creamy consistency before serving again.
By following these steps, you can enjoy your chocolate mousse for a few additional days without sacrificing quality.
Freezing Tips
If you find yourself with extra chocolate mousse or want to prepare it ahead of time, here’s how to freeze it effectively:
– Freezing Capability: While this mousse can be frozen, it’s important to note that the texture may change slightly upon thawing.
– Portioning: Divide the mousse into individual servings in airtight containers or freezer-safe jars. Leave a little space at the top to allow for expansion during freezing.
– Wrapping: If you’re using a larger container, cover it tightly with plastic wrap or aluminum foil before sealing the lid to prevent freezer burn.
– Labeling: Clearly label each container with the date for easy tracking; use freezer tape or a permanent marker.
– Storage Duration: The mousse can be frozen for up to 2 months without significant quality loss.
– Thawing Method: For the best results, transfer the mousse from the freezer to the refrigerator and let it thaw slowly overnight. Avoid thawing at room temperature, as this can alter the texture.
Freezing offers a convenient way to enjoy this decadent dessert later, even if the texture may be slightly different.
Reheating Guide
Since this chocolate mousse is best served chilled and not heated, traditional reheating techniques aren’t applicable. However, if you need to refresh or restore its texture, here are some ideas:
– Microwave: If you must use the microwave, heat the mousse in short bursts of 10-15 seconds at a low power level (30-40%) to avoid cooking the chocolate. Stir gently between intervals to prevent overheating.
– Oven: There’s no need to use the oven for chocolate mousse, as it should be served cold. However, if you have a related dessert that needs warming, set the oven to 300°F and cover it lightly to prevent drying out. Heat for about 10 minutes.
– Stovetop: Again, the stovetop is not recommended for chocolate mousse. However, if you’re working with a chocolate sauce or ganache, heat over low heat, adding a splash of cream to restore its silky texture.
– Texture Restoration Tips: If the mousse appears stiff, gently fold in a bit of heavy cream or milk to restore its lightness and fluffiness before serving.
Using these methods, you can maintain the mousse’s delightful texture while ensuring a satisfying dessert experience.
Nutrition Overview
Each serving of this chocolate mousse is not only indulgent but can also fit into a balanced diet. Here’s a rough nutritional overview per serving:
– Calories: Approximately 320
– Protein: 4g
– Carbohydrates: 28g
– Fat: 24g
– Fiber: 1g
– Sugar: 20g
Key ingredients like heavy cream contribute rich, satisfying fats and protein, while semi-sweet chocolate offers antioxidants that can enhance heart health. The powdered sugar provides sweetness, balanced by the slight bitterness of the chocolate, creating a well-rounded dessert that is both delicious and satisfying. Enjoying this mousse in moderation can add a touch of luxury to your dessert repertoire without compromising your health goals.
Frequently Asked Questions
Q: Can I use a different type of chocolate for this mousse?
A: Absolutely! You can experiment with dark chocolate for a richer flavor or milk chocolate for a sweeter, creamier result. Just ensure the chocolate is of good quality for the best taste.
Q: What can I substitute for heavy cream?
A: If you’re looking for a lighter option, you can use coconut cream or a non-dairy whipped topping. Keep in mind that the texture and flavor may vary slightly.
Q: How can I make this mousse dairy-free?
A: To make a dairy-free version, use full-fat coconut milk in place of heavy cream and a dairy-free chocolate option. Ensure that the powdered sugar is free of any dairy additives.
Q: How do I know when the whipped cream has reached soft peaks?
A: Whipped cream is at soft peaks when you lift the whisk or beaters, and the cream holds its shape but the tips gently curl over. It should look fluffy and voluminous.
Q: Can I add flavors to the mousse?
A: Yes! You can add flavor extracts like almond, orange, or mint to the chocolate mixture. Just be cautious with the quantity to ensure it doesn’t overpower the chocolate flavor.
Q: How long can I keep the mousse in the refrigerator?
A: The mousse can be stored in the refrigerator for up to 3 days in an airtight container. Be sure to check for any off smells or changes in texture before consuming.
Q: Can I use granulated sugar instead of powdered sugar?
A: While you can use granulated sugar, it’s best to use powdered sugar for a smoother texture. If you must use granulated, blend it until finely ground before mixing it into the chocolate.
Q: What kitchen tools do I need to make this mousse?
A: You’ll need a mixing bowl, a whisk or electric mixer, a spatula for folding, and serving dishes. A double boiler or microwave-safe bowl for melting chocolate is also essential.
Final Thoughts
Making this chocolate mousse is a delightful experience that combines simplicity with decadence. Remember, the key to achieving that light, airy texture lies in how gently you fold in the whipped cream—take your time and enjoy the process!
I genuinely can’t wait for you to try this recipe. It’s perfect for any occasion, whether it’s a simple weeknight treat or a grand finale to a special dinner. Share your delicious results with friends and family, and don’t forget to have fun experimenting with different flavors and garnishes.
Now, grab your ingredients and indulge in the bliss of creating this rich chocolate mousse!
Chocolate Mousse 4 Ingredients Recipe (No Egg No Bake) 🍫🥄
Ingredients
- 1 cup heavy whipping cream chilled
- 1/2 cup semi-sweet chocolate chips melted and cooled
- 1/4 cup powdered sugar sifted
- 1 teaspoon vanilla extract
- 1/2 cup milk for thinning if necessary
- 1 tablespoon cocoa powder for garnish
- chocolate shavings for garnish
Instructions
- In a mixing bowl, whip the heavy whipping cream on medium-high speed until soft peaks form, about 3-5 minutes.
- In a separate bowl, combine the melted semi-sweet chocolate chips and sifted powdered sugar, mixing until smooth. Add the vanilla extract and stir well.
- Gently fold the whipped cream into the chocolate mixture in three additions, being careful not to deflate the cream. The mixture should be smooth and well combined.
- If the mousse is too thick, add milk gradually until desired consistency is achieved. Spoon the mousse into serving glasses or bowls.
- Chill the mousse in the refrigerator for at least 25 minutes to set before serving.
- Before serving, dust the top with cocoa powder and add chocolate shavings for garnish.
Notes
Tip 2: The mousse can be made a day ahead and stored in the refrigerator.
Variation: For a twist, add a tablespoon of espresso powder to the chocolate mixture for a mocha flavor.