

A Nutty Twist on a Timeless Classic: Elevate Your Treats with Brown Butter
Introduction
There’s something magical about the way a simple treat can transport you back to your childhood. I remember the first time I tasted Rice Krispie Treats at my best friend’s birthday party. The air was filled with the sweet scent of melting marshmallows, and as I bit into one, the crispy texture mingled delightfully with the gooeyness that enveloped the treat. It was a moment of sheer bliss, and from that day on, my love for these nostalgic bites only grew.
Fast forward to an afternoon spent in my cozy kitchen, I decided to put a twist on that beloved classic. With the comforting smell of butter gently sizzling on the stove and the rich aroma of browned butter wafting around me, I felt a wave of nostalgia. The sound of butter bubbling softly was music to my ears, promising a deeper flavor than I had ever experienced in those childhood treats. I couldn’t wait to see how simple ingredients like mini marshmallows and Rice Krispies could transform into something so decadent.
As I stirred the melting marshmallows into that nutty brown butter blend, it was as if I was bringing the old and new together. The result? A luscious treat that not only rekindled fond memories but also created new ones. With the addition of brown sugar, white chocolate chips, and toasted pecans, these treats became a culinary revelation. They’re no longer just a snack; they’re a celebration of flavors and textures that you’ll want to share with everyone you know. If you’re ready to take your Rice Krispie Treats to the next level, let’s dive into this Brown Butter Rice Krispie Treats Recipe that’s perfect for any occasion.
Why This Recipe Works
What makes this Brown Butter Rice Krispie Treats Recipe stand out from the rest is not just the browned butter; it’s the unique interplay of textures and flavors that come together to create a treat that’s truly unforgettable.
1. Flavor Depth: The browned butter brings a sophisticated, nutty flavor that elevates the traditional sweetness of the marshmallows. As the butter browns, it undergoes a Maillard reaction, creating complex flavors that are rich and caramel-like. This depth is enhanced further by the addition of brown sugar, which contributes a subtle molasses flavor, balancing the sweetness with a hint of bitterness.
2. Texture Contrast: The combination of creamy melted marshmallows and the crispy texture of Rice Krispies is simply irresistible. The key to achieving this delightful contrast lies in the timing and technique. By ensuring that you melt the marshmallows just enough to maintain that gooeyness but not too long that they become overly sticky, you’ll achieve the perfect chewy bites. The toasted pecans add a crunch that breaks through the softness of the marshmallow, making each bite an adventure.
3. Ingredient Roles: Each ingredient in this recipe serves a purpose. The sea salt enhances the flavors, making the sweetness pop, while the vanilla extract adds warmth and depth. The white chocolate chips introduce a creamy sweetness that contrasts beautifully with the nuttiness of the brown butter. Together, they create a harmonious balance that keeps you coming back for more.
This is not your average Rice Krispie treat; it’s a gourmet version that combines nostalgia with sophistication, making it perfect for both children and adults alike.
What Makes It Special
What truly sets this Brown Butter Rice Krispie Treats Recipe apart from the generic versions you may find in stores or cafes?
– Freshness: Making these treats at home means you’re using fresh ingredients, ensuring a more vibrant flavor and texture. Store-bought versions can often be overly sweet and lacking in the rich, nutty undertones that come from freshly browned butter.
– Customization: You have the freedom to tailor these treats to your liking. Want a little more crunch? Add extra toasted pecans. Prefer a hint of chocolate? Double the white chocolate chips. You can even swirl in some peanut butter or Nutella for a delightful twist that elevates the experience.
– Cost-effective: Homemade treats are often more economical than store-bought versions, especially when you consider the quality of ingredients you can control. A simple trip to the grocery store can yield enough ingredients to make several batches, making it a budget-friendly option for parties or gatherings.
– Surprising Elements: The addition of toasted pecans not only adds texture but also a subtle earthiness that balances the sweetness. This unexpected ingredient is often missing from traditional recipes, making these treats stand out and memorable.
Your friends and family will be clamoring for the recipe once they take their first bite, and you’ll take pride in knowing you made a delightful treat from scratch that’s far superior to anything you could buy.
Ingredient Breakdown
Let’s dive into the ingredients that make these Brown Butter Rice Krispie Treats so special:
– Unsalted Butter (1 cup, divided): The base of this recipe, unsalted butter is what you’ll brown to achieve that nutty flavor. Dividing the butter allows for a perfect balance between browning and melting, ensuring the right consistency for your treat.
– Sea Salt (1/2 teaspoon): Don’t underestimate the power of salt! A pinch of sea salt enhances the sweetness and rounds out the flavors beautifully, making the treats taste more complex.
– Vanilla Extract (1 teaspoon): This adds warmth and depth. The aromatic notes of vanilla compliment the nuttiness of the brown butter, bringing everything together harmoniously.
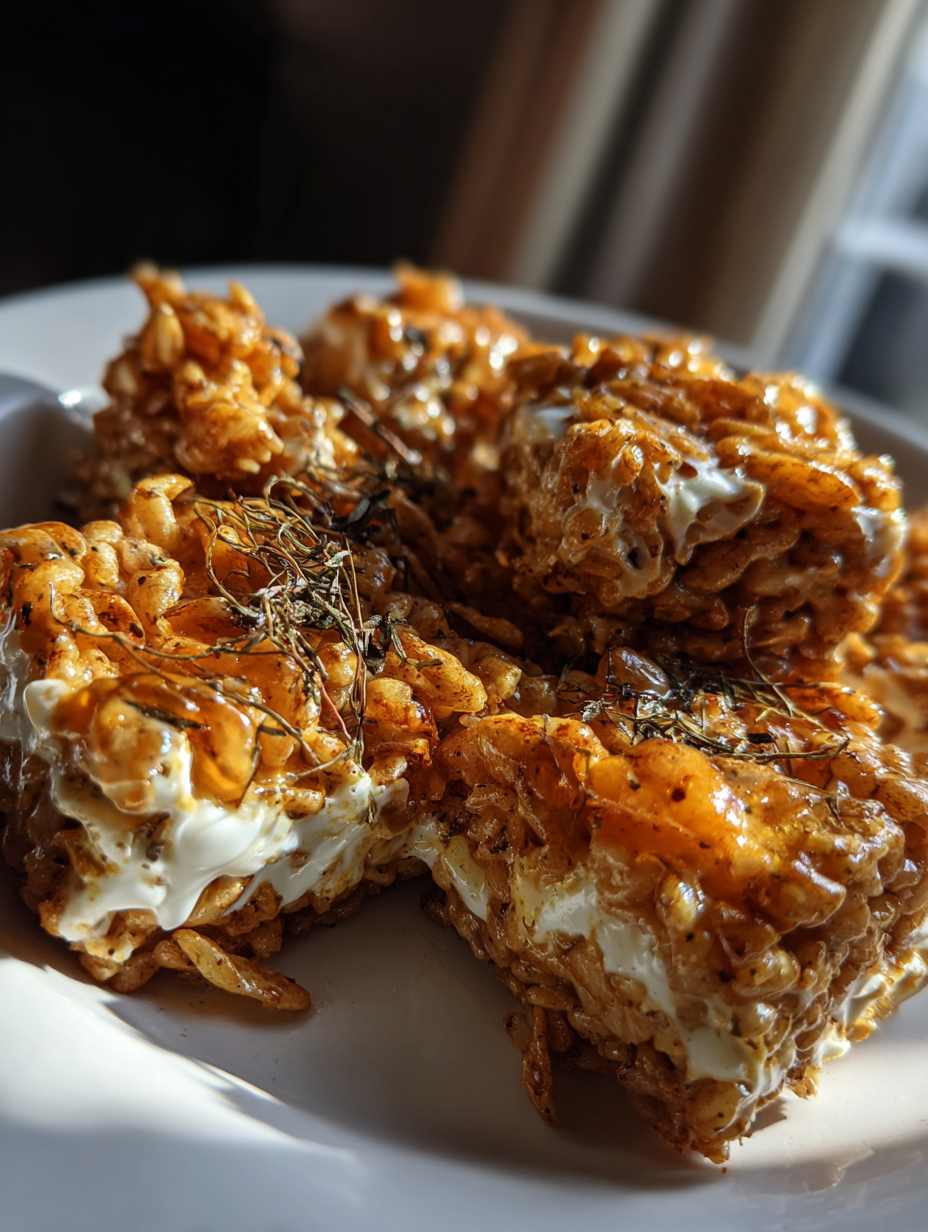
– Mini Marshmallows (4 cups): The star of the show, mini marshmallows provide that quintessential gooeyness. Their smaller size allows for easier melting and even distribution throughout the mixture.
– Rice Krispies Cereal (6 cups): The crunch factor! This classic cereal adds texture and helps to create that delightful contrast with the gooey marshmallows.
– White Chocolate Chips (1/2 cup): These add a creamy sweetness that balances the nutty flavors of the brown butter and the earthiness of the pecans. They melt beautifully into the mixture, providing pockets of sweetness in each bite.
– Brown Sugar (1/2 cup): This ingredient is key for adding a caramel-like flavor that complements the brown butter, giving your treats a rich, luscious taste.
– Toasted Pecans (1/4 cup, chopped): The toasted pecans introduce a delightful crunch and a nutty flavor that elevates these treats from simple to extraordinary. Toasting them enhances their flavor even more.
– Cooking Spray: A simple yet essential tool for greasing your pan, ensuring that your delicious treats don’t stick and are easy to cut into squares.
If you’re looking for substitutions:
– For dairy-free options, use coconut oil or a dairy-free butter substitute.
– For gluten-free alternatives, ensure your Rice Krispies are labeled gluten-free.
– If you’re aiming for a vegan version, look for vegan marshmallows and butter alternatives.
These ingredients come together to create a treat that’s not only delicious but also a joy to make and share. Whether you’re reminiscing about childhood or creating new memories, these Brown Butter Rice Krispie Treats are sure to delight!
Equipment Needed
To create these Brown Butter Rice Krispie Treats, you’ll need a few essential tools:
– Medium Saucepan: A sturdy saucepan is crucial for browning the butter and melting the marshmallows evenly. Choose one with a heavy bottom to prevent burning.
– Spatula: A silicone or wooden spatula is perfect for stirring and folding the mixture. It’s gentle on your cookware and helps you mix without scratching.
– 9×13-inch Baking Pan: This size is ideal for creating the right thickness of treats. Make sure to use a pan that’s sturdy and doesn’t warp in the oven.
– Cooking Spray: To prevent sticking, have some cooking spray or parchment paper on hand to line your baking pan.
– Measuring Cups and Spoons: Precision is key in baking, so make sure to have your measuring tools ready to ensure each ingredient is perfectly portioned.
While these tools are essential, you might also find a whisk helpful for mixing the melted marshmallows, especially if you prefer a smoother texture. If you don’t have a 9×13-inch pan, an alternative baking dish works too, just adjust the thickness of your treats accordingly.
With these tools in your arsenal, you’re all set to whip up a batch of heavenly Brown Butter Rice Krispie Treats that are sure to impress!
Step-by-Step Instructions
1. Melt the Butter:
Begin by placing 1 cup of unsalted butter into a medium saucepan over medium heat. Stir the butter occasionally as it melts to ensure even cooking. You’ll want to watch closely as it transitions from liquid to a bubbly state, then to a golden brown. This should take about 5-7 minutes. The moment you catch a whiff of a nutty aroma and see it turning a rich amber color, you know you’re on the right track. Chef’s Note: Keep the heat steady and avoid turning it too high; burnt butter can ruin the flavor.
2. Add Flavorings:
Once the butter has reached that beautiful deep golden hue, remove it from heat immediately. Stir in 1/2 teaspoon of sea salt and 1 teaspoon of vanilla extract. The salt will help enhance the flavors, while the vanilla adds warmth. Mix until both are fully integrated. You’ll notice a slight bubbling as the vanilla hits the hot butter; that’s a good sign!
3. Incorporate Brown Sugar:
Next, add 1/2 cup of brown sugar to the butter mixture. Return the saucepan to low heat and stir until the sugar is fully dissolved into the butter. This should take about 1-2 minutes. You want a smooth mixture, and if you see any graininess, continue stirring until it disappears. The combination of brown sugar and browned butter will create a caramel-like flavor that elevates your treats.
4. Melt the Marshmallows:
Now it’s time to add the stars of the show: the marshmallows. Pour in 4 cups of mini marshmallows and stir continuously for about 2-3 minutes. You’ll be listening for that delightful squishy sound of marshmallows melting and watching them transform into a glossy, gooey mixture. Chef’s Note: If the marshmallows are not melting quickly, you can increase the heat slightly, but keep stirring to avoid burning.
5. Combine with Rice Krispies:
Once you have a smooth marshmallow mixture, remove the pan from heat. Gradually fold in 6 cups of Rice Krispies cereal. Use a spatula for this step, making sure to coat each puff with the marshmallow mixture. Be gentle here; you want to maintain the airy crunch of the cereal while ensuring every piece is evenly coated. This should take just a minute or two.
6. Add Chocolate and Pecans:
Carefully mix in 1/2 cup of white chocolate chips and 1/4 cup of chopped toasted pecans. The chips will start to melt slightly from the warmth of the mixture, adding extra sweetness and creaminess. If you want to keep the chocolate chunks a bit more distinct, just fold them in without letting them melt completely.
7. Press Into the Pan:
Spray a 9×13-inch baking pan with cooking spray to prevent sticking. Pour your Rice Krispie mixture into the pan and press down firmly using a spatula or your hands. The goal is to create an even layer without crushing the cereal too much. Let it cool at room temperature for about 20 minutes before cutting into squares. Enjoy the anticipation as the sweet aroma fills your kitchen!
Pro Tips for the Best Results
1. Use a Light-Colored Pan: A light-colored saucepan will help you monitor the butter as it browns. Dark pans can make it difficult to see when the butter starts to burn, leading to a bitter flavor.
2. Measure Ingredients Accurately: For the best texture, ensure you measure your Rice Krispies and marshmallows accurately. Too much cereal can lead to a dry texture, while too few can make them overly gooey.
3. Don’t Rush the Cooling Process: Allowing the treats to cool properly ensures they hold their shape when you cut them. If you rush this step, they may fall apart or be too sticky.
4. Use Fresh Ingredients: Stale marshmallows can negatively affect the texture of your treats. Ensure your marshmallows are fresh for optimal gooeyness.
5. Press Evenly: When pressing the mixture into the pan, use a spatula coated lightly with cooking spray to keep it from sticking. Press evenly to avoid uneven treats that might crumble.
6. Customize Sweetness: If you prefer less sweetness, reduce the white chocolate chips or even substitute dark chocolate for a more balanced flavor profile.
7. Try Adding Spice: For an exciting twist, consider adding a pinch of cinnamon or nutmeg to the butter while browning. This adds warmth and complexity to your treats.
Common Mistakes to Avoid
1. Burning the Butter: This is a common pitfall. If you allow the butter to cook too long, it will scorch, resulting in a bitter flavor. Correct Approach: Keep a close eye on it and remove it from the heat as soon as it turns golden brown and smells nutty.
2. Not Stirring Enough: Failing to stir the marshmallows enough can lead to uneven melting and lumps. Correct Approach: Stir continuously until you achieve a completely smooth mixture; this ensures that every bite is perfectly gooey.
3. Overmixing the Cereal: Overmixing can crush the Rice Krispies, leading to dense treats. Correct Approach: Gently fold in the cereal until just coated. You want to maintain that light, airy crunch!
4. Using the Wrong Size Pan: If your pan is too small, the mixture will be too thick and won’t set properly. Correct Approach: Always use a 9×13-inch pan for the right thickness and texture.
5. Not Greasing the Pan: Skipping this step can result in a sticky disaster. Correct Approach: Always spray the pan with cooking spray or line it with parchment paper to ensure easy removal.
6. Cutting Too Soon: Cutting the treats while they’re still warm can lead to a messy result. Correct Approach: Let the treats cool at room temperature for about 20 minutes to ensure they hold their shape.
7. Ignoring Ingredient Quality: Low-quality marshmallows or butter can affect the overall taste. Correct Approach: Invest in good-quality ingredients for the best flavor and texture in your treats.
Creative Variations
1. Seasonal Variation: Pumpkin Spice Rice Krispie Treats – Add 1/2 cup of pumpkin puree and 1 teaspoon of pumpkin spice to the melted marshmallow mixture. This seasonal twist infuses your treats with a warm, cozy flavor that’s perfect for fall.
2. Dietary-Friendly Version: Vegan Brown Butter Rice Krispie Treats – Substitute the unsalted butter with vegan butter and use vegan marshmallows. This adaptation keeps the delicious flavor while accommodating a plant-based diet.
3. Gourmet Elevated Version: Salted Caramel Macadamia Rice Krispie Treats – Replace the white chocolate chips with caramel bits and fold in 1/2 cup of chopped macadamia nuts. Drizzle with melted dark chocolate and a sprinkle of sea salt for an indulgent treat.
4. Quick 15-Minute Version: Microwave Rice Krispie Treats – Instead of browning the butter, melt 1 cup of butter in the microwave, then add the marshmallows, stirring until melted. Follow the rest of the recipe as usual for a quicker, no-fuss version.
5. Kid-Friendly Version: Rainbow Sprinkles Rice Krispie Treats – After mixing in the Rice Krispies, fold in 1 cup of colorful sprinkles. Kids will love the added fun, and it makes for a bright presentation at parties.
6. International Twist: Matcha Green Tea Rice Krispie Treats – Add 2 tablespoons of matcha powder to the melted marshmallow mixture for a unique flavor and beautiful green color. This twist introduces an earthy taste while still being wonderfully sweet.
Serving Ideas
Elevate your Brown Butter Rice Krispie Treats with thoughtful presentation that will make them the star of any gathering. Here are a few delightful ways to serve them:
1. Garnish with Sea Salt and Pecans: Just before serving, sprinkle a touch of flaky sea salt on top, along with a few extra chopped toasted pecans. This adds a rustic charm and a beautiful contrast to the sweet marshmallows.
2. Chocolate Drizzle: Melt some dark or white chocolate and drizzle it artistically over the sliced treats. This not only enhances the flavor but creates a visually stunning effect that will have everyone reaching for seconds.
3. On a Cake Stand: Arrange the treats in a staggered formation on a decorative cake stand. Add some colorful candies or edible flowers around the base to brighten up the display.
4. Mini Treats: For a fun twist, cut the treats into smaller squares and serve them in mini cupcake liners. This makes them easy to grab and adds a pop of color to your dessert table.
5. Pair with Fresh Fruit: Serve alongside fresh berries or sliced strawberries for a refreshing balance. The bright colors and natural sweetness of the fruit will complement the rich flavors of the treats beautifully.
What to Serve With
Enhance the enjoyment of your Brown Butter Rice Krispie Treats by pairing them with complementary dishes. Here are some delightful suggestions:
1. Chai Latte: The warm, spiced flavors of chai contrast perfectly with the sweetness of the treats, creating a cozy afternoon snack.
2. Vanilla Ice Cream: A scoop of creamy vanilla ice cream alongside these treats not only introduces a delightful temperature contrast but also enhances the overall sweetness.
3. Chocolate Dipped Strawberries: The tartness from fresh strawberries balances the richness of the Rice Krispie treats, while the chocolate adds an indulgent touch.
4. Coffee or Espresso: A bold coffee or rich espresso provides a wonderful contrast to the sweetness. The bitterness cuts through the sugary notes, making each bite more enjoyable.
5. Fruit Salad: A refreshing fruit salad with citrus fruits like oranges and tangy berries adds brightness and a burst of freshness that complements the richness of your treats.
6. Nutty Trail Mix: A homemade mix of nuts, dried fruits, and a sprinkle of chocolate chips offers a crunchy, savory contrast to the gooey treats while providing extra energy.
Storage Guide
To keep your Brown Butter Rice Krispie Treats fresh and delicious, proper storage is essential. Here’s how to do it right:
1. Use Airtight Containers: Store your treats in a glass or plastic airtight container. This prevents air from getting in and keeps them chewy instead of hardening.
2. Refrigerate: Keep them in the refrigerator at a temperature of 34°F to 40°F (1°C to 4°C) to extend their freshness.
3. Duration: When stored properly, these treats will last up to 5 days in the fridge. However, they are best enjoyed within the first few days for optimal texture.
4. Signs of Spoilage: If your treats become excessively hard or dry, or if you notice any discoloration or off smells, it’s best to discard them.
5. Refreshing Before Serving: If they’ve hardened, you can restore some softness by placing a slice of bread in the container with them overnight. This will help rehydrate them, making them delightful again!
Freezing Tips
These Brown Butter Rice Krispie Treats freeze beautifully, allowing you to enjoy them even longer. Here’s how to freeze them effectively:
1. Portioning: Cut your treats into squares before freezing. This makes it easy to grab just the right amount later.
2. Wrapping Method: Wrap each square in plastic wrap, then place them in a freezer-safe zip-top bag or airtight container. Be sure to squeeze out as much air as possible.
3. Labeling: Don’t forget to label your bag with the date so you know when they were frozen.
4. Duration: They can be stored in the freezer for up to 3 months without significant loss of flavor.
5. Quality Changes: While the texture may be slightly different after thawing, they should still be tasty and enjoyable.
6. Best Thawing Method: To thaw, simply remove the desired number of treats from the freezer and let them sit at room temperature for about 30 minutes. This helps them regain their original texture.
Reheating Guide
If you want to enjoy your Brown Butter Rice Krispie Treats warm and gooey again, here are specific reheating instructions:
– Microwave: Place a treat on a microwave-safe plate and cover it with a damp paper towel to prevent drying out. Heat on medium power for about 15-20 seconds, checking to ensure it’s heated through but not overly hot.
– Oven: Preheat your oven to 300°F (150°C). Arrange the treats on a baking sheet lined with parchment paper. Heat for about 5-7 minutes, covering them loosely with aluminum foil to prevent them from becoming too hard.
– Stovetop: In a non-stick skillet over low heat, add a splash of water to create steam. Place the treats in the skillet, cover, and gently heat for about 5 minutes, allowing the steam to soften them.
– Restoring Texture: For all methods, aim to heat just until warm, which will help restore that delightful gooeyness without making them tough.
Nutrition Overview
While these Brown Butter Rice Krispie Treats are a sweet indulgence, they do offer some nutritional insights. Here’s a breakdown of approximate values per serving:
– Calories: 200
– Protein: 2g
– Carbohydrates: 30g
– Fat: 9g
– Fiber: 0.5g
– Sugar: 14g
Health Benefits of Key Ingredients:
– Brown Butter: Rich in healthy fats and provides a unique nutty flavor, often associated with beneficial antioxidants.
– Pecans: Packed with healthy fats, fiber, and protein, they can contribute to heart health and provide essential nutrients.
– Rice Krispies: A low-fat option that provides a satisfying crunch while being a source of carbohydrates for energy.
Enjoy these treats with the knowledge that they can provide a little boost of energy and delightful flavors!
Frequently Asked Questions
Q: Can I substitute the unsalted butter with margarine?
A: While margarine can be used, it won’t provide the same rich, nutty flavor that comes from browning real butter. If you’re seeking a dairy-free option, look for a high-quality dairy-free butter.
Q: Can I make these treats gluten-free?
A: Yes! Simply use gluten-free Rice Krispies. This will ensure that everyone can enjoy these treats without any concerns.
Q: How can I make these treats vegan?
A: To make a vegan version, substitute the butter with a plant-based alternative and use vegan marshmallows. This will give you a similar delightful taste while keeping it plant-based.
Q: What can I use instead of white chocolate chips?
A: You can replace white chocolate chips with dark chocolate chips for a more intense chocolate flavor or omit them entirely if you prefer a simpler treat.
Q: Can I add other mix-ins?
A: Absolutely! Feel free to add in your favorite mix-ins such as crushed cookies, dried fruits, or even candy pieces to customize your treats.
Q: How long does it take for the treats to set?
A: After pressing the mixture into the pan, allow the treats to cool at room temperature for about 20 minutes before cutting. This will help them firm up nicely.
Q: Do I have to use mini marshmallows?
A: While mini marshmallows melt quickly and evenly, you can use regular-sized marshmallows; just cut them into smaller pieces for easier melting.
Q: What type of pan works best for these treats?
A: A 9×13-inch baking pan works perfectly. If you prefer thicker treats, you could use a smaller pan, but you’ll need to adjust the cooling time accordingly.
Final Thoughts
Creating Brown Butter Rice Krispie Treats is not just about satisfying your sweet tooth; it’s about indulging in simple pleasures and sharing joy with those around you. Remember to keep a watchful eye while browning the butter to achieve that perfect nutty flavor, and don’t hesitate to customize with your favorite mix-ins!
As you dive into making these delightful treats, I encourage you to share your creations with friends and family. Your enthusiasm will be infectious! So gather your ingredients, roll up your sleeves, and whip up a batch that’s sure to become a favorite. You won’t regret it!
Brown Butter Rice Krispie Treats Recipe (Viral Upgrade) 🍚✨
Ingredients
- 1 cup unsalted butter divided, for browning
- 1/2 teaspoon sea salt to enhance flavor
- 1 teaspoon vanilla extract for added flavor
- 4 cups mini marshmallows for gooeyness
- 6 cups Rice Krispies cereal for crunch
- 1/2 cup white chocolate chips for extra sweetness
- 1/2 cup brown sugar for caramel flavor
- 1/4 cup toasted pecans chopped, for texture
- cooking spray to grease the pan
Instructions
- In a medium saucepan, melt the unsalted butter over medium heat, stirring occasionally until it turns a deep golden brown and develops a nutty aroma, about 5-7 minutes. Be careful not to burn it.
- Remove the browned butter from heat and stir in the sea salt and vanilla extract until fully combined. Add the brown sugar and mix until dissolved.
- Return the saucepan to low heat and add the mini marshmallows, stirring constantly until completely melted and smooth, about 2-3 minutes.
- Remove from heat and immediately fold in the Rice Krispies cereal until evenly coated. Gently mix in the white chocolate chips and toasted pecans.
- Lightly grease a 9x13-inch baking pan with cooking spray. Pour the mixture into the pan and press down firmly with a spatula or your hands to create an even layer.
- Allow the treats to cool at room temperature for about 20 minutes before cutting them into squares. Store in an airtight container.
Notes
Tip 2: These treats can be made ahead and stored for up to 5 days.
Variation: Add a swirl of peanut butter or Nutella on top before cooling for a decadent twist.