

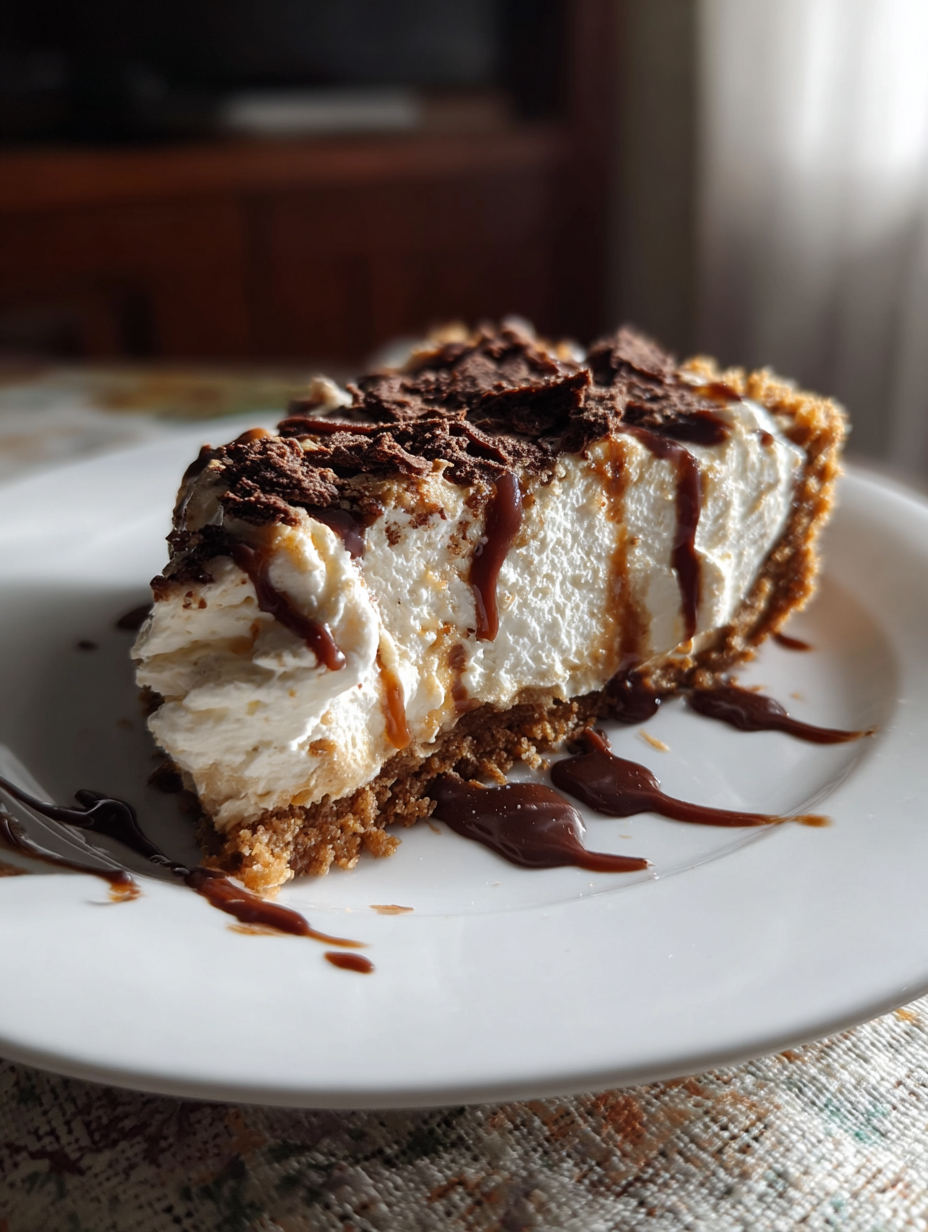
Sweet Layers of Joy: The Ultimate No-Bake Banoffee Pie
Introduction
Growing up, dessert was always a special occasion in my household. I fondly remember the first time I tasted Banoffee Pie. It was a crisp autumn afternoon, and the air was filled with the warm, comforting scent of baked goods wafting through my grandmother’s kitchen. She had invited us over for tea, and as I walked in, the sight of a glossy, golden pie resting on the counter made my heart race with excitement. The layers gleamed—rich, caramelized toffee folded into perfectly ripe banana slices, all capped with a cloud of whipped cream that begged to be devoured.
With every forkful, I experienced a symphony of flavors and textures. The crunch of the biscuit base contrasted deliciously with the creamy toffee and the silky bananas, while the whipped cream melted in my mouth like a gentle hug. Each bite was a reminder of how simple ingredients could come together to create something truly magical. It was at that moment I declared this dessert my absolute favorite.
Now, many years later, I find myself recreating that same pie in my kitchen, evoking the memories and flavors of my grandmother’s warm embrace. The best part? This no-bake version allows you to whip it up in just a few minutes, and it’s guaranteed to impress. Whether you’re hosting friends or treating yourself, this Banoffee Pie is a delightful way to bring a taste of Britain into your home. Let’s dive into the recipe and create your own sweet layers of joy!
Why This Recipe Works
What makes this Banoffee Pie a standout dessert is the harmonious blend of flavors and textures. The key lies in the contrast: you have the crumbly texture of the Digestive biscuit base, the smooth richness of the caramelized condensed milk, and the lightness of the whipped cream. Each layer plays a crucial role in delivering a satisfying bite, where every forkful is a delightful surprise.
The Digestive biscuits serve as the backbone of the pie, providing a subtle sweetness and a satisfying crunch that you can’t help but fall in love with. The melted unsalted butter binds the crumbs together, creating a sturdy crust that holds the filling beautifully.
As for the filling, the sweetened condensed milk transforms into a luscious toffee when cooked, marrying beautifully with the fresh, sliced bananas. This balance of sweet and creamy is the heart of the recipe. Using ripe bananas is essential—when they are perfectly sweet and slightly soft, they add depth to your pie while enhancing the overall flavor.
Topping it all off is the whipped cream, which adds a light, airy contrast to the dense layers beneath. The inclusion of granulated sugar and vanilla extract not only sweetens the cream but elevates it with a subtle aromatic note that whispers of indulgence.
What sets this version apart from others is its ease of preparation. You don’t have to turn on the oven or worry about overbaking, making it perfect for warm days or last-minute gatherings. Plus, each ingredient shines brightly, culminating in a pie that tastes as though it took hours to prepare when in reality, it’s a breeze!
What Makes It Special
This Banoffee Pie recipe has several unique qualities that elevate it beyond the standard versions you might find at a cafe or in a store.
– Freshness: There’s something undeniably special about making your own pie. The bananas are fresher, the whipped cream is light and fluffy, and you can taste the love and care that goes into every layer. Store-bought versions often lack this personal touch and can be overly sweet or artificial-tasting.
– Cost-effective: Making this pie at home can save you money compared to buying a fancy dessert. Plus, you can control the ingredients, choosing high-quality brands that suit your taste and dietary needs.
– Customization: One of the best parts about this recipe is its versatility. You can easily add layers of peanut butter for a nutty twist or sprinkle in some chopped nuts for added texture. The possibilities are endless!
– Surprising elements: The dusting of unsweetened cocoa powder on top, combined with chocolate shavings, adds a touch of sophistication, enhancing the pie’s visual appeal while introducing a subtle bitterness that balances the overall sweetness.
This recipe truly allows you to bring a taste of tradition into your own kitchen, crafting a dessert that feels special every time you make it.
Ingredient Breakdown
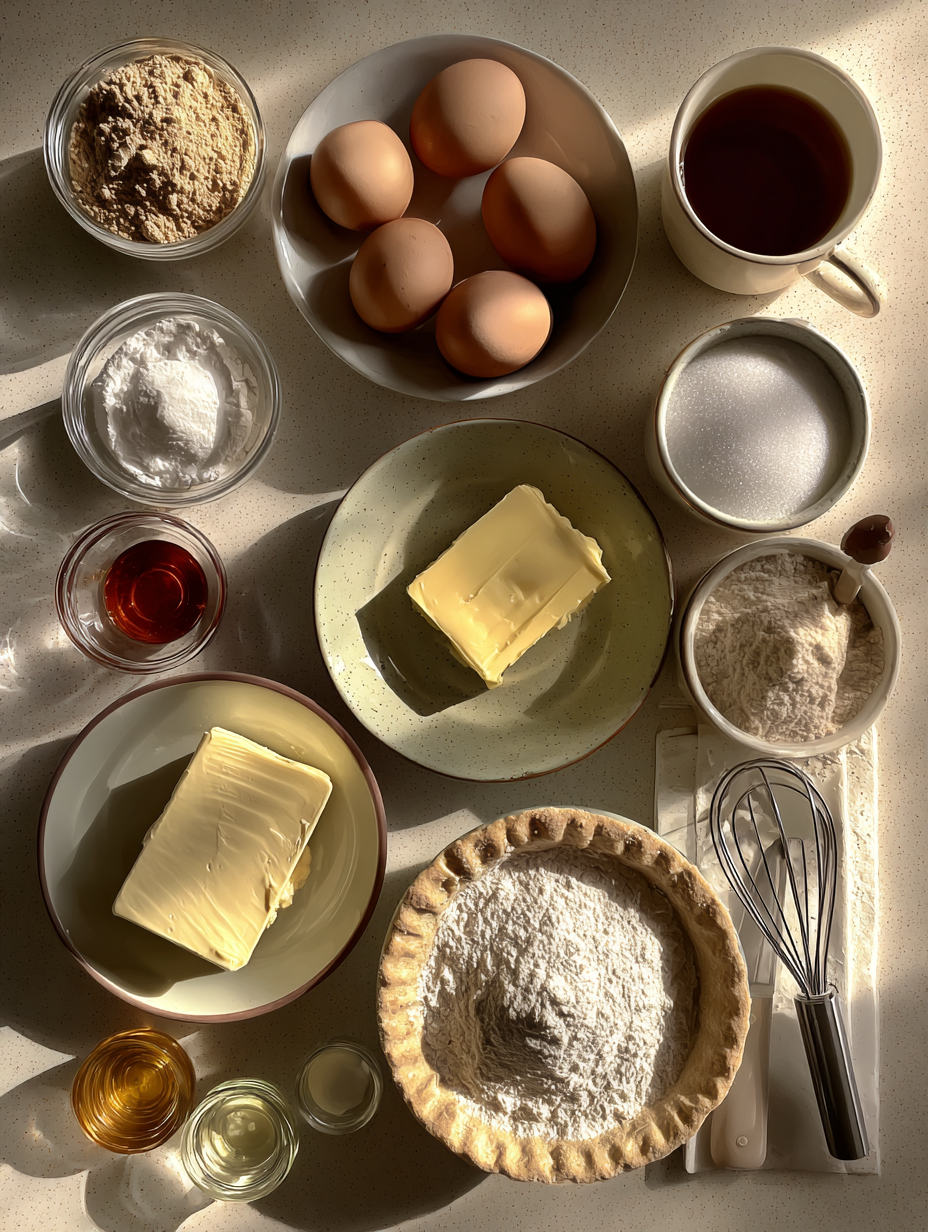
1. Digestive biscuits (1 cup): These British biscuits are perfect for the crust due to their crumbly texture and mild sweetness. They provide a sturdy base that complements the rich filling. If you can’t find Digestive biscuits, graham crackers or even shortbread can be acceptable substitutes.
2. Unsalted butter (1/2 cup): The butter adds richness and helps bind the biscuit crumbs together. Unsalted butter is preferred to control the overall saltiness of the pie. For a dairy-free version, you can substitute with coconut oil or a vegan butter alternative.
3. Sweetened condensed milk (1 can): This is the star of the filling; when cooked, it transforms into a luscious toffee that adds sweetness and depth. If you prefer a dairy-free option, look for coconut condensed milk available in many grocery stores.
4. Bananas (2 medium): Ripe bananas are essential for optimal flavor and texture. They should be slightly speckled with brown for the best sweetness. If you want to experiment, consider using plantains for a unique flavor twist!
5. Heavy whipping cream (1 cup): This is what creates the luxurious topping. Make sure it’s cold for easy whipping. For a lighter option, you can use half-and-half, but be aware that the texture will be less airy and rich.
6. Granulated sugar (2 tablespoons): This sweetens the whipped cream and enhances its flavor. You can use powdered sugar for a smoother consistency, or if you prefer a less sweet option, feel free to reduce the amount.
7. Vanilla extract (1 teaspoon): This adds a warm, aromatic note that enhances the overall flavor of the pie. Use pure vanilla extract for the best results—imitation vanilla can be overly synthetic in taste.
8. Unsweetened cocoa powder (1 tablespoon): This is for dusting the top, adding a touch of elegance and a slight bitterness that pairs perfectly with the sweetness of the pie.
9. Chocolate shavings: These are optional but highly recommended for presentation and an additional layer of chocolatey goodness.
As you gather your ingredients, keep in mind that the quality of each item will directly affect the final result. Look for ripe bananas, fresh cream, and quality chocolate to elevate your Banoffee Pie to new heights!
Equipment Needed
To create this delightful Banoffee Pie, you’ll need a few essential tools:
– 9-inch pie dish: This is crucial for shaping your pie. A glass or ceramic dish is ideal as it allows you to see the beautiful layers. If you don’t have a pie dish, a springform pan can also work.
– Mixing bowl: A medium-sized mixing bowl is perfect for combining your biscuit crumbs and melted butter.
– Saucepan: Use a medium saucepan for cooking the sweetened condensed milk. Make sure it has a heavy bottom to prevent scorching.
– Whisk or electric mixer: To whip your cream, a whisk will do the job, but an electric mixer makes it quicker and easier, especially if you want to achieve stiff peaks.
– Spatula: A rubber spatula will help you spread the whipped cream evenly over the bananas and get every bit of caramel from the saucepan.
– Sifter: If you have one, use it to dust the cocoa powder evenly over the top of the pie.
While these tools are essential for making the pie, you can certainly improvise. For instance, a large bowl can double as a mixing bowl, and a fork can work in place of a whisk if necessary. Just remember, having the right tools will make your baking experience smoother and more enjoyable!
Step-by-Step Instructions
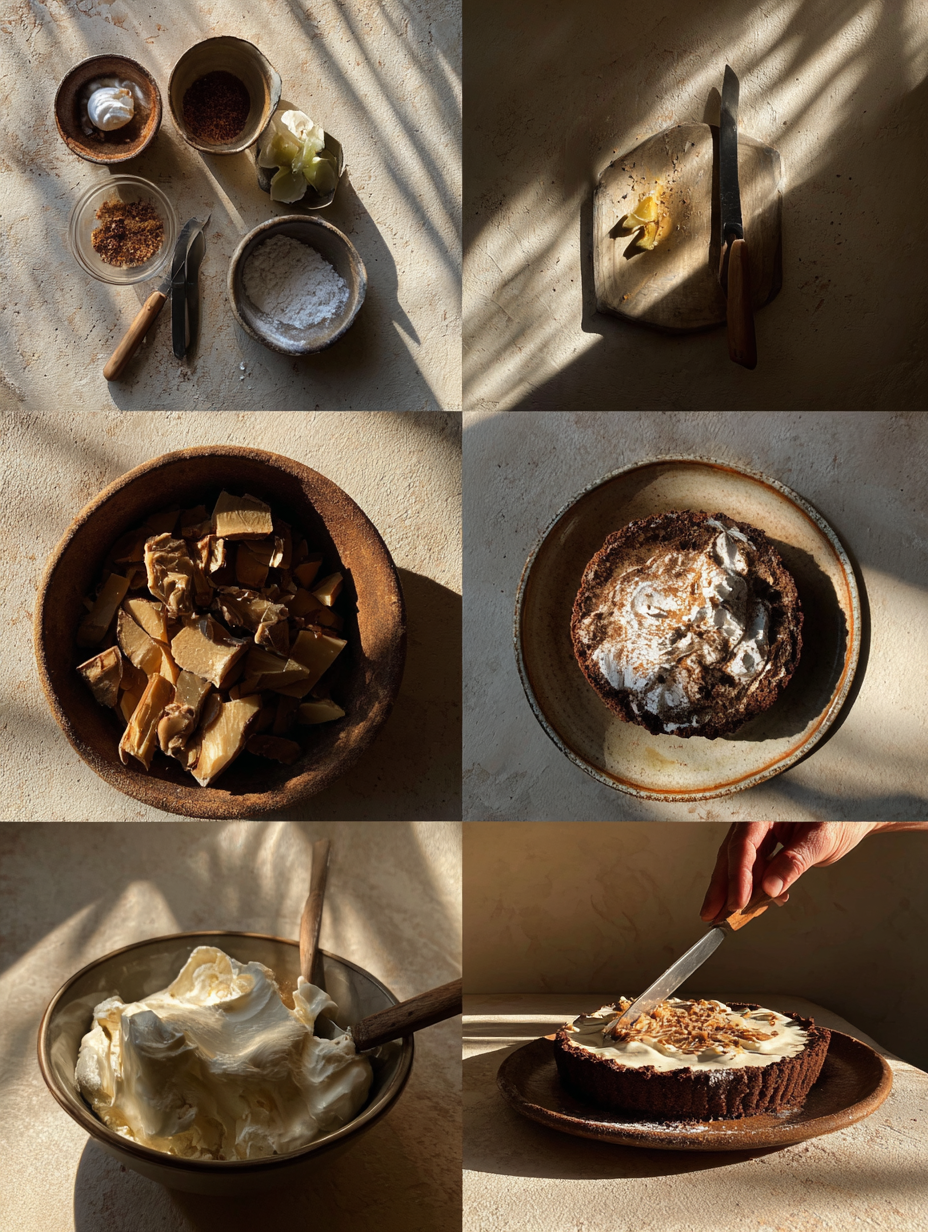
1. Prepare the Biscuit Crust
Start by taking your Digestive biscuits and crushing them into fine crumbs. You can do this by placing the biscuits in a resealable plastic bag and using a rolling pin to crush them, or you can use a food processor for a quicker method. Once you have about 1 cup of fine crumbs, transfer them to a mixing bowl. Chef’s Note: Make sure there are no large chunks, as this will affect the texture of your crust. Pour in 1/2 cup of melted unsalted butter and mix until the crumbs are thoroughly coated and resemble wet sand. The mixture should hold together when pressed.
2. Form the Crust
Now, take the biscuit and butter mixture and press it firmly into the bottom of a 9-inch pie dish. Use the back of a measuring cup or your fingers to press it evenly along the bottom and up the sides. You want a compact crust to hold all the delicious fillings, so be firm but gentle. Look for a smooth, even surface that doesn’t crumble when you touch it. After you’ve formed the crust, place the pie dish in the refrigerator while you prepare the filling—this will help it set.
3. Create the Toffee Filling
Next, you’ll make the toffee filling. Pour the sweetened condensed milk into a medium-sized saucepan over medium heat. Stir continuously with a wooden spoon or a silicone spatula for about 15-20 minutes. As it cooks, it will gradually thicken and change color to a lovely light caramel. Listen for a gentle bubbling sound—this means it’s cooking properly. You want to remove it from heat when it reaches a thick, pourable consistency that is not too runny. Chef’s Note: If you stop stirring, it can burn, so be diligent!
4. Assemble the Pie Layers
Once your caramel has slightly cooled, pour it evenly over the chilled biscuit crust, spreading it out with a spatula. Next, layer 2 medium ripe bananas, sliced into rounds, over the toffee. The bananas should be placed closely together to maximize flavor in every bite. Look for ripe bananas; they should be slightly speckled for optimal sweetness. This layering not only adds flavor but also creates a lovely contrast in textures with the creamy toffee and the biscuit base.
5. Whip the Cream
In a separate bowl, pour in 1 cup of cold heavy whipping cream. Add 2 tablespoons of granulated sugar and 1 teaspoon of vanilla extract. Using an electric mixer, whip the cream on medium speed until soft peaks form—this should take 2-3 minutes. Be careful not to overwhip; you want it to be fluffy and light, not grainy. Chef’s Note: The cream should be cold to whip properly, so keep it in the fridge until you’re ready to use it. As you whip, notice the texture changing to a light, airy consistency.
6. Finish with Toppings
Using a spatula, gently spread the whipped cream over the bananas, smoothing it out to create an even layer that covers them completely. Be careful not to deflate the whipped cream; fold it gently into the bananas. Once the cream is spread, dust the top with unsweetened cocoa powder and add some chocolate shavings for a decorative finish. Finally, cover the pie with plastic wrap and refrigerate for at least 2 hours (or overnight if you can resist!) to let it set.
Pro Tips for the Best Results
1. Choose the Right Bananas: Using ripe bananas is crucial; they should be yellow with some brown spots. This indicates they are sweet and soft, which complements the caramel and cream beautifully. Avoid underripe bananas, as they can be too firm and lack flavor.
2. Chill Your Equipment: If you want to whip your cream to perfection, consider chilling your mixing bowl and beaters for about 10-15 minutes before whipping. This helps the cream to whip faster and hold its shape better.
3. Even Layering: When adding the bananas, ensure they are evenly distributed and not clumped together. This allows for a balanced flavor in each bite and prevents any one section from being too banana-heavy.
4. Monitor Your Caramel: When making the toffee filling, watch for the color change closely. You want it to be a light caramel color, indicating that it’s cooked properly. If it gets too dark, it can become bitter.
5. Refrigerate Overnight: If you have the time, letting the pie chill overnight will enhance the flavors as they meld together. The crust will also firm up even more, making it easier to slice.
6. Custom Sweetness: Adjust the sugar in your whipped cream according to your taste. If you prefer a less sweet dessert, try reducing the sugar slightly, as the toffee is quite sweet on its own.
7. Presentation Matters: For a stunning presentation, consider using a piping bag to decorate the whipped cream topping instead of spreading it with a spatula. This adds a professional touch and allows for a beautiful finish.
Common Mistakes to Avoid
1. Overcooking the Caramel: If the sweetened condensed milk is cooked too long, it can become too thick or even burn, ruining the flavor. Correct Approach: Stir continuously and watch for the light caramel color; remove it from heat as soon as it reaches the right consistency.
2. Using Unripe Bananas: Unripe bananas can make your pie taste lacking in flavor and texture. Correct Approach: Always opt for bananas that are slightly overripe, as they’ll be sweeter and softer, enhancing the overall dessert.
3. Not Chilling the Cream: If the heavy cream is not cold enough, it won’t whip properly and may end up grainy. Correct Approach: Keep the cream chilled in the fridge until you’re ready to whip it, and chill your equipment for best results.
4. Skipping the Refrigeration Step: Serving the pie immediately can lead to a messy experience with soft layers. Correct Approach: Always refrigerate the pie for a couple of hours to allow it to set, making it easier to slice and serve.
5. Too Much Whipping: Overwhipping the cream can lead to a grainy texture, which isn’t appealing. Correct Approach: Stop whipping as soon as you see soft peaks; it should look fluffy but still hold its shape.
6. Not Pressing the Crust Firmly: A loose crust can crumble when sliced, making it hard to serve. Correct Approach: Press the biscuit and butter mixture firmly into the pie dish to ensure it holds together well when served.
7. Ignoring Presentation: A pie that looks beautiful is more enticing to eat. Correct Approach: Take the time to dust with cocoa powder and add chocolate shavings; it makes a difference in both appearance and enjoyment.
Creative Variations
1. Seasonal Variation: Autumn Banoffee Pie – Add a layer of thinly sliced apples cooked with cinnamon and sugar between the toffee and bananas. The warm spices will create a comforting twist perfect for fall.
2. Dietary-Friendly Version: Vegan Banoffee Pie – Substitute the Digestive biscuits with gluten-free cookies and use coconut cream whipped with powdered sugar instead of heavy cream. For the toffee, use coconut condensed milk or make a homemade date caramel.
3. Gourmet Elevated Version: Dark Chocolate Banoffee Pie – Use a chocolate biscuit base instead of plain Digestive biscuits. Layer rich dark chocolate ganache on top of the toffee before adding the bananas, then top with luxurious whipped cream and chocolate curls.
4. Quick 15-Minute Version: Speedy Banoffee Cups – Instead of a pie, use individual cups. Layer crushed biscuits, toffee, sliced bananas, and whipped cream in small glasses for a quick and easy presentation. This is perfect for last-minute gatherings.
5. Kid-Friendly Version: Banoffee Sundae – Create a fun sundae by layering crushed biscuits, toffee sauce, banana slices, and whipped cream in a tall glass. Kids will love the interactive element of building their own dessert!
6. International Twist: Banoffee Tiramisu – Combine the classic Banoffee flavors with Italian tiramisu by layering coffee-soaked biscuits with toffee, bananas, and mascarpone whipped cream for a unique dessert experience. Dust with cocoa powder for that classic finish.
Serving Ideas
When you’re ready to present your Banoffee Pie, consider these beautiful serving ideas that will make your dessert truly stand out:
1. Classic Slice: Cut the pie into generous wedges, about a seventh of the pie per serving. Place each slice on a chilled dessert plate and drizzle a little extra caramel sauce over the top for a tempting touch.
2. Individual Cups: For a fun twist, spoon the pie filling into clear glass dessert cups. Layer the biscuit crust, toffee, bananas, and whipped cream, finishing with cocoa powder and chocolate shavings on top. This makes for a visually appealing, portion-controlled dessert.
3. Garnished Elegance: Top each serving with a fresh mint leaf or a few edible flowers for a splash of color. A thinly sliced banana fan placed delicately on the side adds elegance and freshness.
4. Biscuit Crumble Top: For added texture, sprinkle some leftover biscuit crumbs over the whipped cream before dusting with cocoa. This not only enhances the look but also delivers a delightful crunch.
5. Serving with a Side: Pair each slice with a small dollop of crème fraîche or a scoop of vanilla bean ice cream. The tangy cream or creamy ice cream complements the rich flavors of the pie perfectly, creating a harmonious balance.
These serving ideas will not only enhance the visual appeal of your Banoffee Pie but also elevate the experience for your guests, making every bite a delightful adventure.
What to Serve With
To truly complement your Banoffee Pie, consider pairing it with these delightful dishes:
1. Earl Grey Tea: The floral and citrus notes of Earl Grey contrast beautifully with the sweetness of the pie, providing a refreshing palate cleanser.
2. Chocolate Stout Cake: For the chocolate lovers in your life, a rich chocolate stout cake brings a deep, dark flavor that balances the sweetness of the pie while adding a sophisticated touch.
3. Fresh Fruit Salad: A light and vibrant fruit salad, featuring berries and citrus, adds a refreshing brightness that cuts through the richness of the pie, making for a well-rounded dessert experience.
4. Espresso or Coffee: The boldness of espresso or a well-brewed cup of coffee pairs superbly with the dessert. The caffeine kick and slight bitterness contrast with the pie’s sweetness.
5. Vanilla Bean Panna Cotta: The creamy and subtly sweet panna cotta is a delightful way to further indulge your guests, while the light texture provides a lovely balance to the heaviness of the pie.
6. Savory Cheese Platter: For a unique twist, serve a cheese platter with a variety of cheeses such as a sharp cheddar or creamy brie. The savory flavors and textures will create a sophisticated contrast to the dessert.
These pairings not only enhance your Banoffee Pie experience but also create an inviting atmosphere for your gathering.
Storage Guide
To ensure your Banoffee Pie stays fresh and delicious, follow these storage tips:
– Container Type: Store any leftovers in an airtight container if you have already cut the pie. If it’s still intact, cover the pie dish tightly with plastic wrap or aluminum foil to prevent it from absorbing any unwanted odors from the fridge.
– Temperature: Your fridge should be set to a temperature of 35°F to 38°F (1.6°C to 3.3°C) to keep the pie at its best.
– Shelf Life: When stored properly, your Banoffee Pie will keep for up to 3 days in the refrigerator. After that, the bananas may start to brown, and the crust could become soggy.
– Signs of Spoilage: Look for any off odors, discoloration on the bananas, or a watery texture. If you notice any of these signs, it’s best to discard the pie.
– Refreshing Before Serving: If you find your pie has lost some of its allure, you can refresh it by whipping up a little more cream to spread on top or simply adding a sprinkle of cocoa powder and chocolate shavings before serving.
Following these guidelines will help you enjoy your Banoffee Pie for days to come while maintaining its delightful taste and texture.
Freezing Tips
Unfortunately, Banoffee Pie does not freeze well. The bananas can become mushy and brown, and the whipped cream may lose its airy texture upon thawing. However, if you must freeze leftovers, here are some tips:
– Portioning: Cut the pie into individual slices to make it easier to thaw only what you need.
– Wrapping Method: Wrap each piece tightly in plastic wrap, followed by a layer of aluminum foil to prevent freezer burn.
– Labeling: Don’t forget to label your wrapped pie with the date, so you know when to use it.
– Freezer Life: Your pie will keep in the freezer for about 1 month, though for the best quality, aim to consume it sooner.
– Thawing Method: To thaw, place the wrapped slices in the refrigerator for several hours, or overnight. This slow thaw will help preserve texture better than thawing at room temperature.
Be mindful that the texture may not be the same as fresh, but you can still enjoy the flavors.
Reheating Guide
If you find yourself needing to refresh your Banoffee Pie, here’s how to do it without compromising its texture:
– Microwave: Place a slice on a microwave-safe plate. Heat on medium power for about 10-15 seconds. Monitor closely to prevent drying out, and avoid heating it too long to maintain the cream’s texture.
– Oven: Preheat your oven to 350°F (175°C). Place the pie on a baking sheet and cover with aluminum foil to protect the whipped cream. Heat for 10-15 minutes, just until warmed through.
– Stovetop: If you prefer, you can place a slice in a skillet over low heat. Add a teaspoon of water to the pan to create steam and cover with a lid. Heat for about 5 minutes until warmed.
These methods will help restore some warmth and softness to your dessert while keeping it enjoyable.
Nutrition Overview
Enjoying a slice of Banoffee Pie can be a delightful treat! Here’s an approximate breakdown of the nutritional values per serving:
– Calories: 400
– Protein: 4g
– Carbohydrates: 55g
– Fat: 20g
– Fiber: 2g
– Sugar: 28g
Key Ingredients Benefits:
– Bananas provide potassium and vitamins C and B6, which are beneficial for heart health and energy levels.
– Heavy Whipping Cream offers calcium and vitamin A, vital for bone health and vision.
– Digestive Biscuits add fiber, which can aid digestion and keep you feeling fuller for longer.
Indulging in this dessert can be a sweet way to enjoy some of these health benefits while treating yourself to a delicious experience.
Frequently Asked Questions
Q: Can I use graham crackers instead of Digestive biscuits?
A: Absolutely! Graham crackers are a great substitute. Just crush them finely and combine with melted butter to create the crust. The flavor will be slightly different, but still delicious.
Q: What can I use instead of heavy cream for a lighter version?
A: If you’re looking for a lighter option, you can use whipped coconut cream or a whipped topping made with reduced-fat cream. Keep in mind that this may change the flavor profile slightly.
Q: How can I make this recipe gluten-free?
A: To make a gluten-free version, simply use gluten-free digestive biscuits or any suitable gluten-free cookie that can be crushed for the crust. The rest of the ingredients are naturally gluten-free.
Q: How far in advance can I make this pie?
A: You can prepare the Banoffee Pie up to 1 day in advance. Just make sure to cover it tightly and keep it in the refrigerator until you’re ready to serve.
Q: Can I skip the toffee-making step?
A: Yes, if you’re short on time, you can use store-bought caramel sauce instead of homemade toffee. Just pour it over the crust and layer the bananas and cream as directed.
Q: What type of bananas should I use?
A: Always use ripe bananas for the best flavor and texture. Look for bananas that are yellow with some brown spots for optimal sweetness and creaminess.
Q: How should I store leftovers?
A: Store any leftover pie in an airtight container or cover it tightly with plastic wrap in the refrigerator. It will stay fresh for up to 3 days.
Q: Can I add other fruits to this recipe?
A: Definitely! Feel free to add other fruits such as strawberries or raspberries for additional flavor and color. Just layer them alongside or replace some of the bananas for a fruity twist.
Final Thoughts
As you dive into making this Banoffee Pie, remember that the key lies in using ripe bananas and ensuring your whipped cream is freshly whipped for the best taste and texture. This dessert is not just a treat; it’s an experience meant to be savored and shared with those you love. I can’t wait for you to try this recipe and see the joy it brings to your table. So gather your ingredients, roll up your sleeves, and get ready to create a dessert that will leave everyone asking for seconds!